
FluentRead - Open Source Translation Plugin
🌊 FluentRead is a revolutionary open-source browser translation plugin, enabling everyone to have a native-like reading experience.
- Project Address: https://github.com/FluentRead/FluentRead
🌟 Core Features
Intelligent Translation Engine
- Multi-engine Support: Supports 20+ translation engines
- Traditional Translation: Microsoft Translator, Google Translate, DeepL, etc.
- AI Large Models: OpenAI, DeepSeek, Kimi, Ollama, etc.
- Custom Engines: Support for custom translation service configuration
Immersive Reading Experience
- Bilingual Display: Original text and translation displayed side by side for easier reading
- Word Selection Translation: Select any text to get instant translation results
- One-click Copy: Quickly copy translations to improve reading efficiency
- Full-page Translation: Use the floating ball to translate entire web pages with one click, no page refresh needed
Privacy and Customization
- Privacy Protection: All data stored locally, open source and transparent code
- Highly Customizable: Rich customization options to meet different scenario needs
- Completely Free: Open source and free, non-commercial project
📦 Installation Methods
| Browser | Installation Method |
|---|---|
| Chrome | Chrome Web Store | Domestic Mirror (third-party mirror, not an official channel; verify before installing) |
| Edge | Edge Add-ons Store |
| Firefox | Firefox Add-ons Store |
🚀 Configuration Methods
For security reasons, newer versions of FluentRead have removed the "fill configuration from a web page" feature. Configure it manually with the steps below.
Manual Configuration in FluentRead
- Click the FluentRead icon in the browser toolbar, click Settings in the popup to open the full settings page, and go to Translation Services on the left.
- Click + 自定义服务 (custom service) above the service list. In the 添加 OpenAI 兼容服务 (add OpenAI-compatible service) window, fill in the fields below, then click 保存服务 (save service):
| Field | Value |
|---|---|
服务名称 (service name) | 88API (any name you can recognize) |
接口地址 (endpoint) | https://api.88api.ai (https://api.88api.ai/v1 also works) |
| API Key | Key copied from the 88API console "API Keys" page (starts with sk-) |
首个模型 (first model) | An 88API model name such as gpt-6.1-sol or deepseek-v4-flash |
- On the service details page, check the model, endpoint and API Key. When 检查通过 (check passed) appears under the API Key, the connection works.
To use the English interface, change App language in General settings. In English, the same page shows the fields as Model, Service name, Endpoint URL and API key:
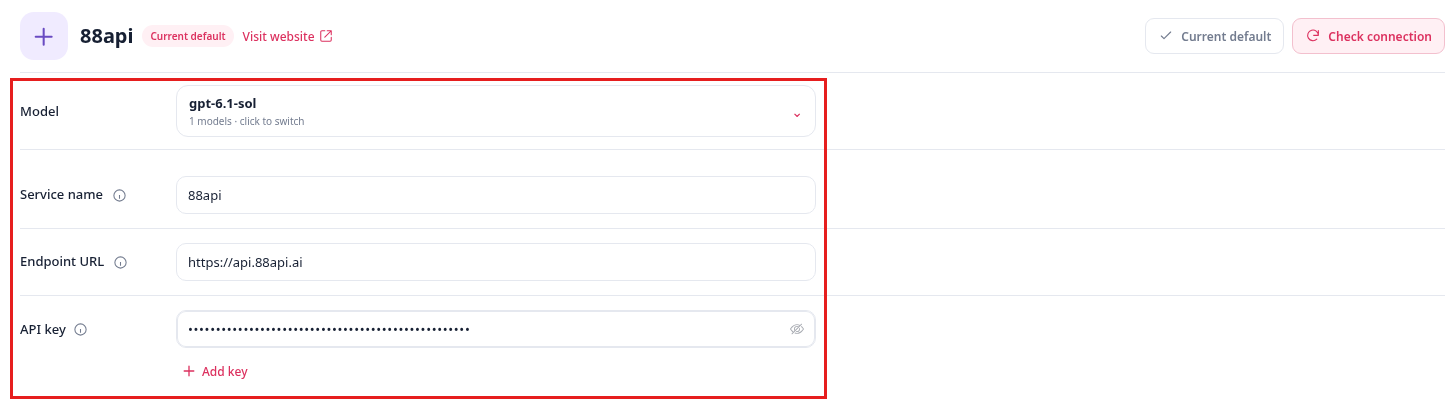
- Go back to General Settings and select the service you just added as the default web page translation service to start using it.
DeepChat - Commercial-Friendly Full-Featured AI Agent Client
DeepChat guide — connect this open-source, commercial-friendly full-featured AI Agent client to 88API and import DeepChat configuration with DeepLink in one click.
Memoh - Containerized AI Agent Platform
Memoh integration guide — Connect the self-hosted containerized AI agent platform to 88API, creating AI bots with long-term memory for Telegram, Discord, Lark, QQ, WeChat, and more.