
OpenAI Codex CLI


Project Introduction
Codex CLI is a coding agent from OpenAI that runs locally on your computer.
Codex CLI is a coding agent from OpenAI that runs locally on your computer.
- Official Homepage: https://chatgpt.com/codex
- Project Homepage: https://github.com/openai/codex
- Installation Method: See the tutorial below on this page
Demonstration
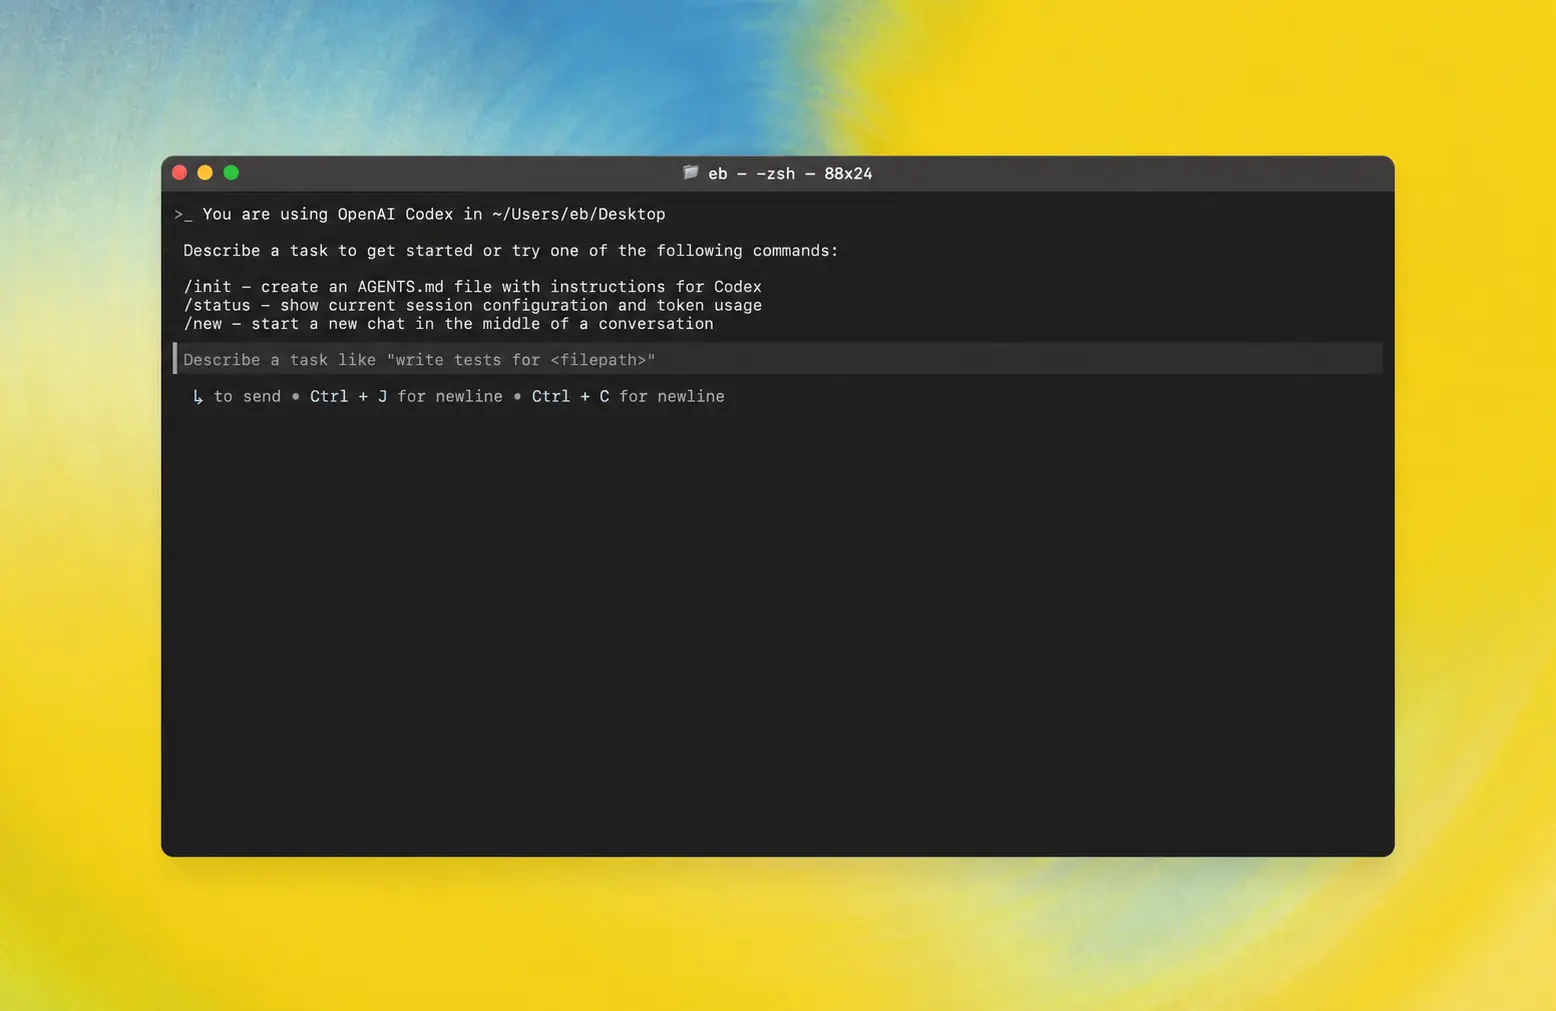
Features
| Function Category | Feature |
|---|---|
| Terminal-Based Coding Assistant | Codex CLI is a terminal-based interactive coding assistant used for editing code, generating patches, and running commands in the command line. |
| Tool-Driven Architecture | Provides tools such as apply_patch, shell, update_plan, and multi_tool_use for controlled modifications to repository files and operations. |
| Atomic Patch Editing | Uses a specialized patch format to atomically add/update/delete files via apply_patch, facilitating auditing and rollback. |
| Sandboxing and Approval | Supports sandboxing policies (e.g., workspace-write, read-only) and approval modes (untrusted, on-request, never) to control write and network access permissions. |
| Plan Tracking | update_plan is used to list steps and track status, requiring only one in_progress step at all times to maintain clear progress. |
| Interaction Guidelines | Sends brief introductory explanations before important operations, maintaining a friendly, concise tone and providing progress updates. |
| Security Constraints | Adheres to strict rules (no arbitrary changes to unrelated files, no adding copyright headers, no executing destructive commands), requiring user approval for sensitive operations. |
| Testing and Formatting | Recommended to run relevant tests and formatting tools after modification, but not responsible for fixing issues unrelated to the current task. |
| Output and Style | Final output adheres to CLI rendering specifications (e.g., ** headings, backticks for paths/commands), maintaining a scannable and concise structure. |
| Parallel Execution | Supports running multiple tools in parallel via multi_tool_use.parallel to improve efficiency. |
AI Model Configuration Method
Windows Graphical Guide
1. Open Terminal
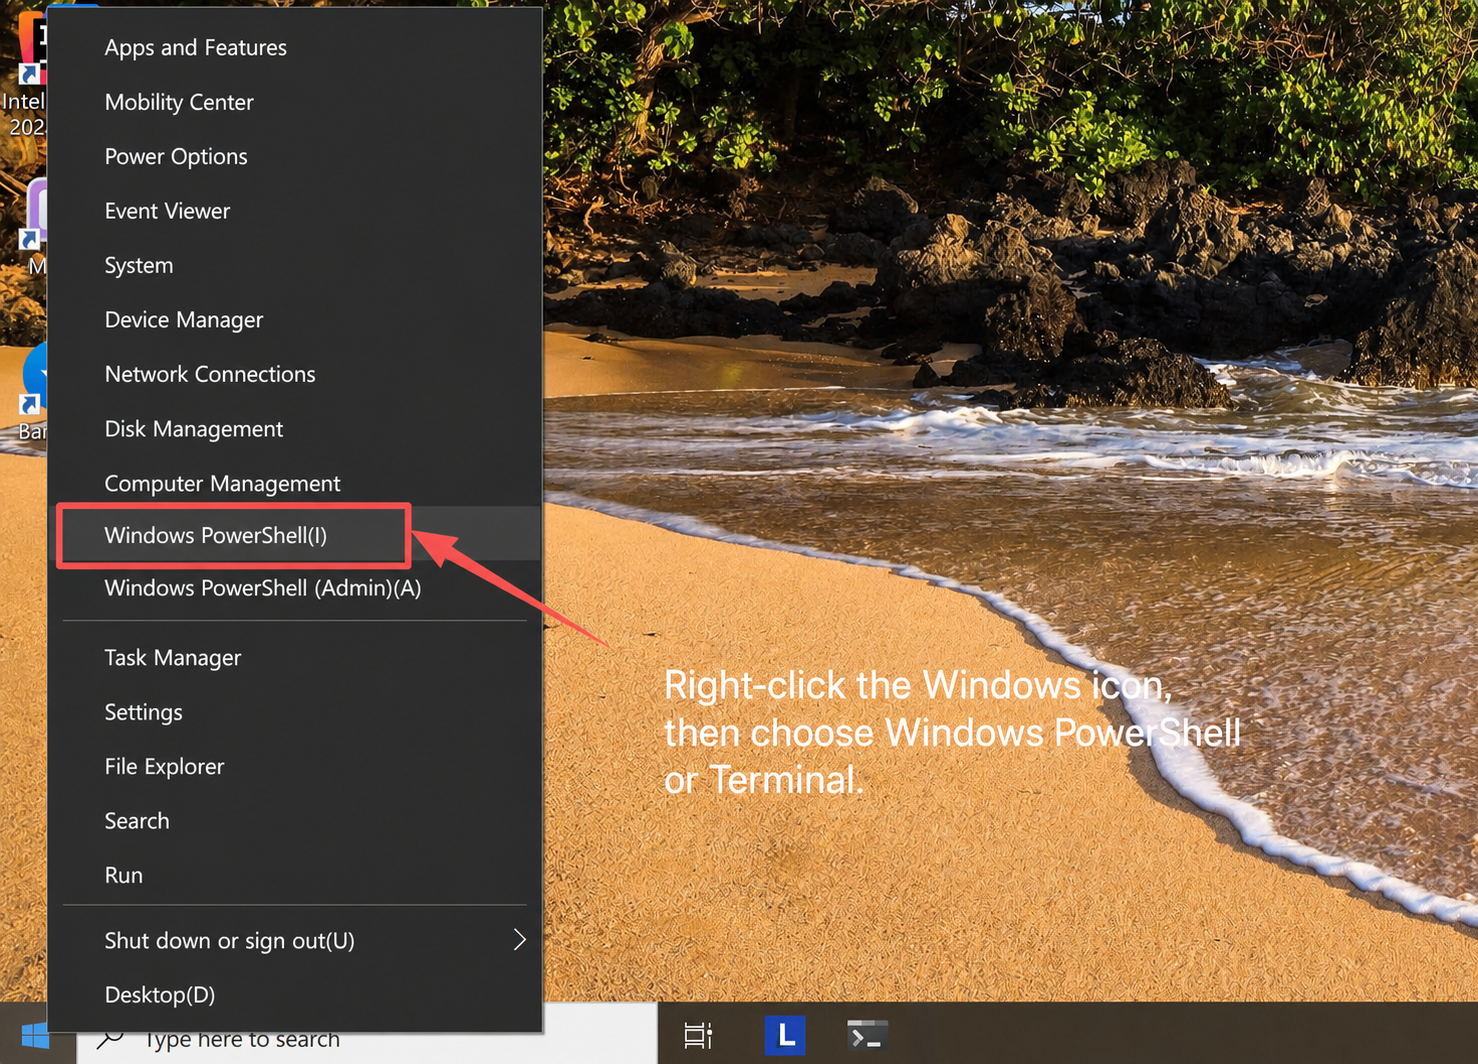
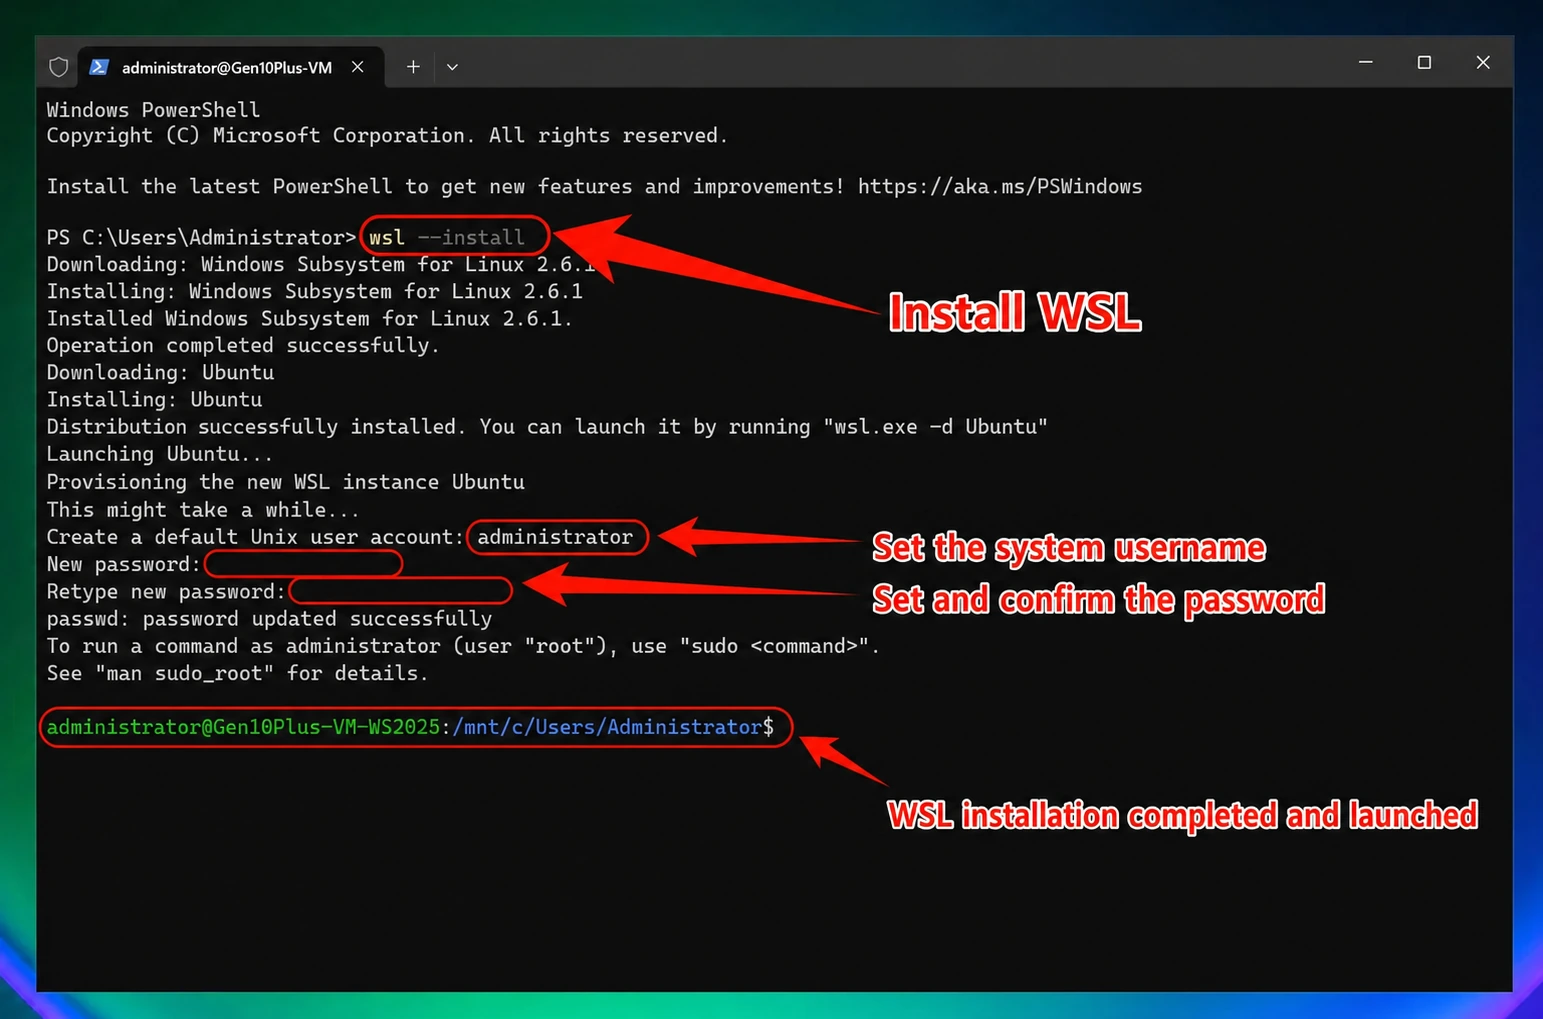
2. Install WSL
Codex now runs natively on Windows: you can install it directly in PowerShell with powershell -ExecutionPolicy ByPass -c "irm https://chatgpt.com/codex/install.ps1 | iex" (or npm i -g @openai/codex if Node.js is already installed), configure it with the PowerShell version of the setup script from step 4, and then run codex directly in PowerShell. If you need Linux tooling, use WSL2 as described below (in that case both Codex and the setup script must run inside WSL; see step 4).
Install WSL2, Restart Windows Computer
wsl --install Restart the Windows computer after installation
Windows Notes
- It is recommended to use PowerShell instead of CMD
- If you encounter permission issues, try running as administrator
- Some antivirus software may flag this as a false positive; you may need to add it to a whitelist
Download Node Version Manager (NVM)
After rebooting, open PowerShell, type wsl to enter Ubuntu, then run:
curl -o- https://raw.githubusercontent.com/nvm-sh/nvm/master/install.sh | bash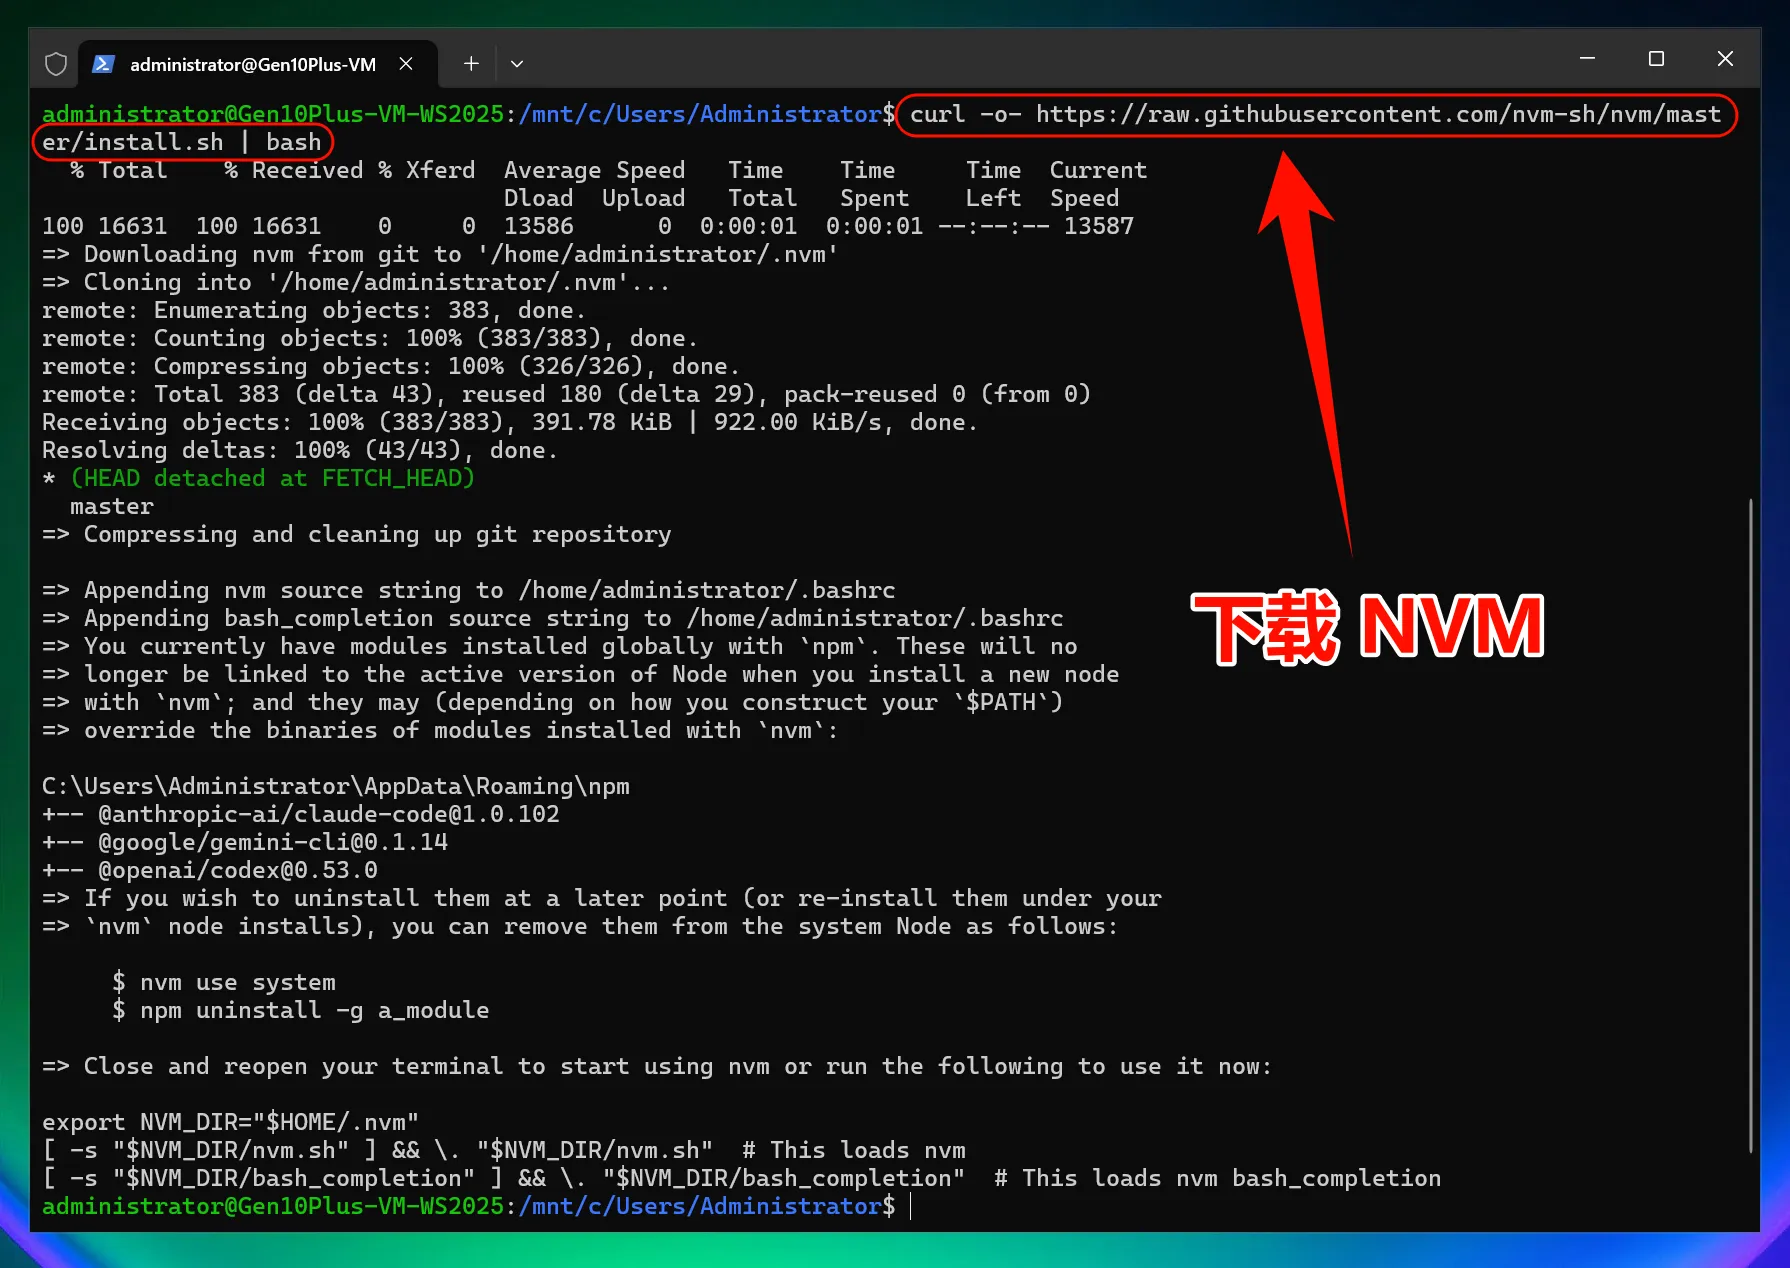
NVM Install Node.js 22
Open a new PowerShell window in the tab bar and start WSL wsl
Install Node.js (the Codex npm package requires Node.js 16 or later; 22 LTS is recommended):
nvm install 22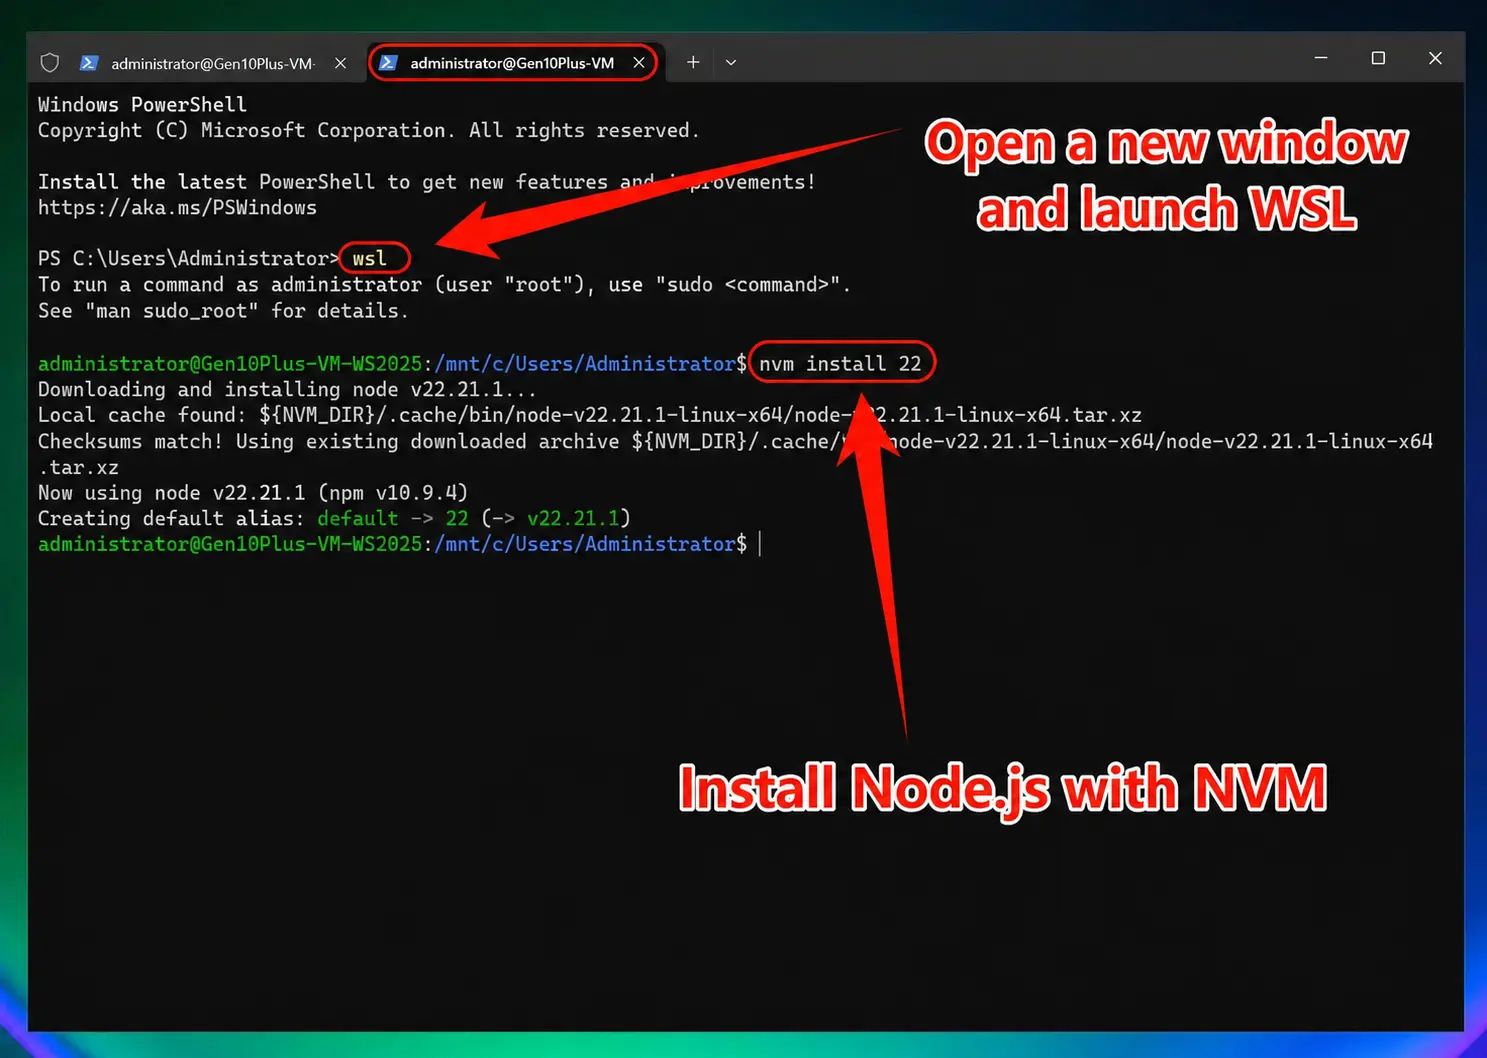
3. Install Codex CLI
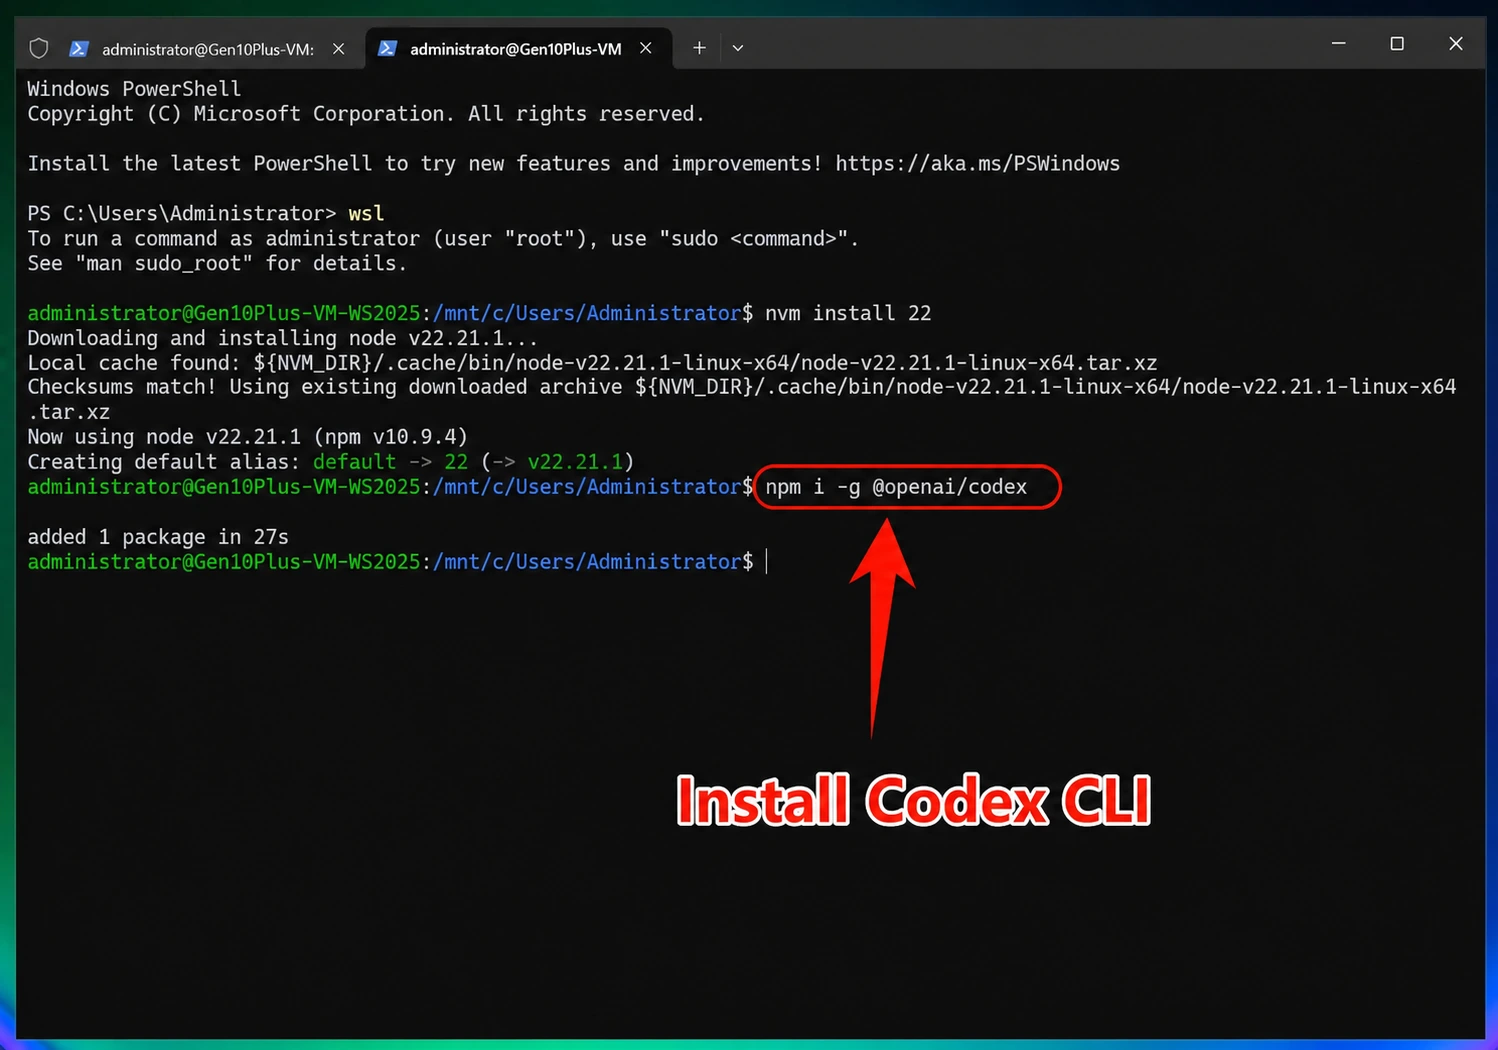
Install Codex CLI
npm i -g @openai/codex This command downloads and installs the latest
version of Codex CLI from the official npm repository.
4. Modify Configuration File (inside WSL)
Codex is installed in WSL, so its configuration must also be written inside WSL. In PowerShell, type wsl to enter Ubuntu, then run:
One-Click Modification of Codex CLI Configuration File (inside WSL)
bash <(curl -fsSL https://88api.ai/helper/codex-cli-setup.sh)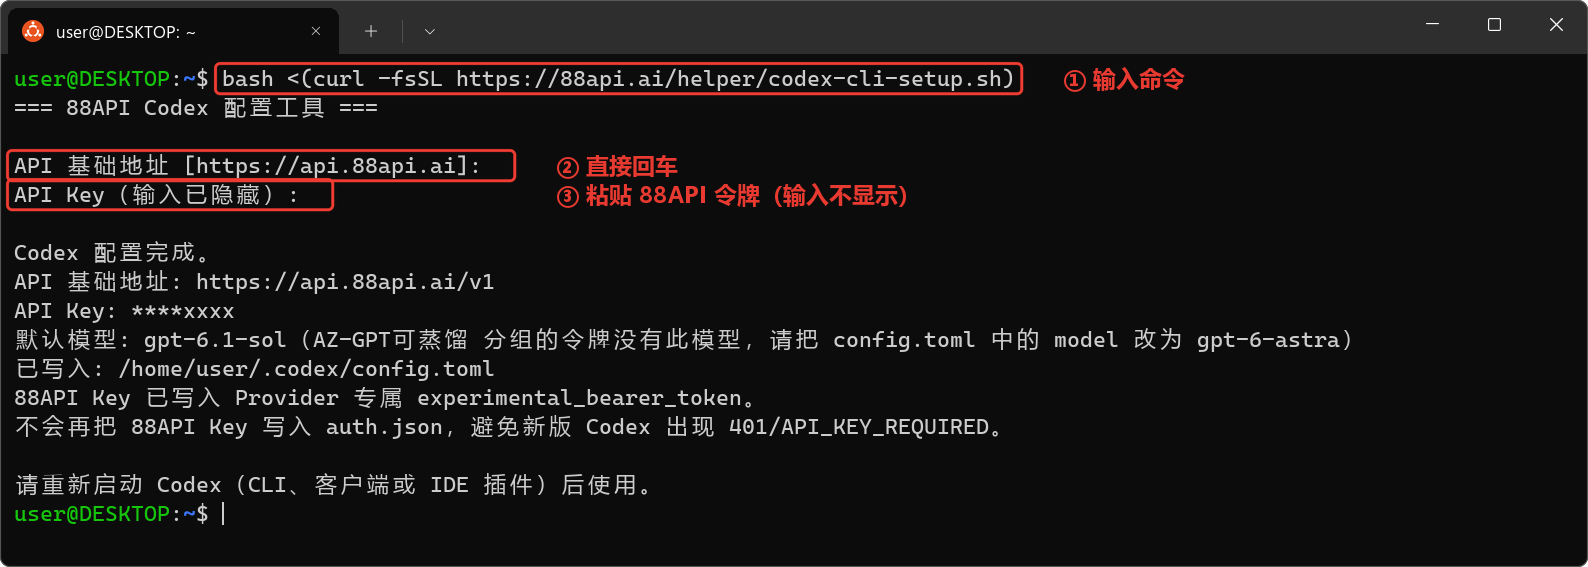
The script's prompts are in Chinese; the values are the same as in the text.
At the API 基础地址 (API base URL) prompt, just press Enter (the default is https://api.88api.ai; the script appends /v1 itself, giving https://api.88api.ai/v1), then paste your 88API token (the input is hidden). The script writes ~/.codex/config.toml inside WSL (not %USERPROFILE%\.codex on Windows; if CODEX_HOME is set, it writes there instead) and by default uses
model_provider = "88api", wire_api = "responses" and a provider-scoped
experimental_bearer_token; at the end it prints API 基础地址: https://api.88api.ai/v1 and 已写入: …/config.toml. The new script no longer writes the 88API key into
auth.json.OPENAI_API_KEY, which avoids API_KEY_REQUIRED /
401 Unauthorized in newer Codex versions.
Note: the script overwrites an existing
config.toml. The original file is backed up automatically asconfig.toml.bak.<timestamp>(the script prints已备份原配置: …). If you had configured MCP servers, trusted projects or other providers, merge them back from the backup.
Without WSL (native Windows PowerShell)
Use the PowerShell version of the script only if you install and run Codex in native Windows PowerShell (without WSL). It writes %USERPROFILE%\.codex\config.toml:
curl.exe --ssl-no-revoke -fsSL https://88api.ai/helper/codex-cli-setup.ps1 -o "$env:TEMP\codex-cli-setup.ps1"
PowerShell -NoProfile -ExecutionPolicy Bypass -File "$env:TEMP\codex-cli-setup.ps1"
The prompts and the written settings are the same as above; afterwards, run codex directly in PowerShell.
Manual config.toml Configuration (Optional)
To configure manually, write the following to ~/.codex/config.toml (on native Windows: %USERPROFILE%\.codex\config.toml):
model = "gpt-6.1-sol"
model_provider = "88api"
model_reasoning_effort = "high"

[model_providers.88api]
name = "88API"
base_url = "https://api.88api.ai/v1"
wire_api = "responses"
supports_websockets = false
experimental_bearer_token = "sk-your-88api-key"
Note: base_url must end with /v1 (Codex only appends /responses and never adds /v1 itself; without /v1 the request is redirected to the website and fails). wire_api must be responses (newer Codex versions removed chat).
5. Start Using Codex CLI
You can now start using Codex CLI!
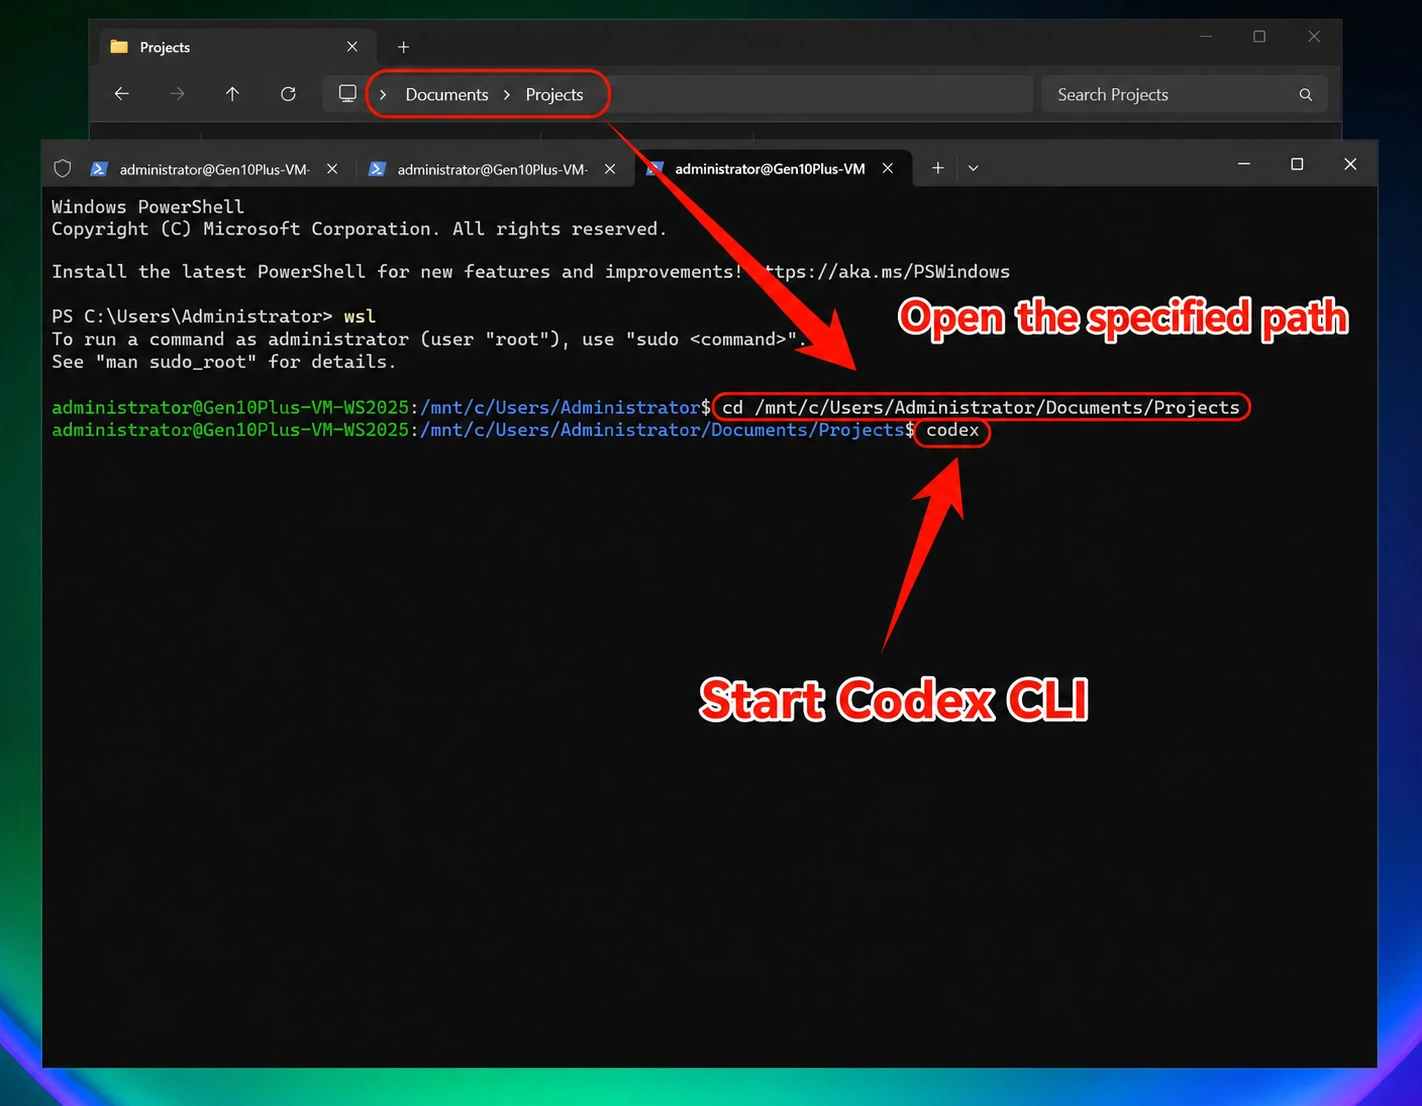
Launch Codex CLI
First type wsl to enter Ubuntu. Launch Codex CLI directly: codex. To use it in a specific project: cd ~/code/your-project (keeping projects in the WSL Linux file system is recommended; a Windows folder is written as cd /mnt/c/Users/<username>/path/to/project), then run codex.
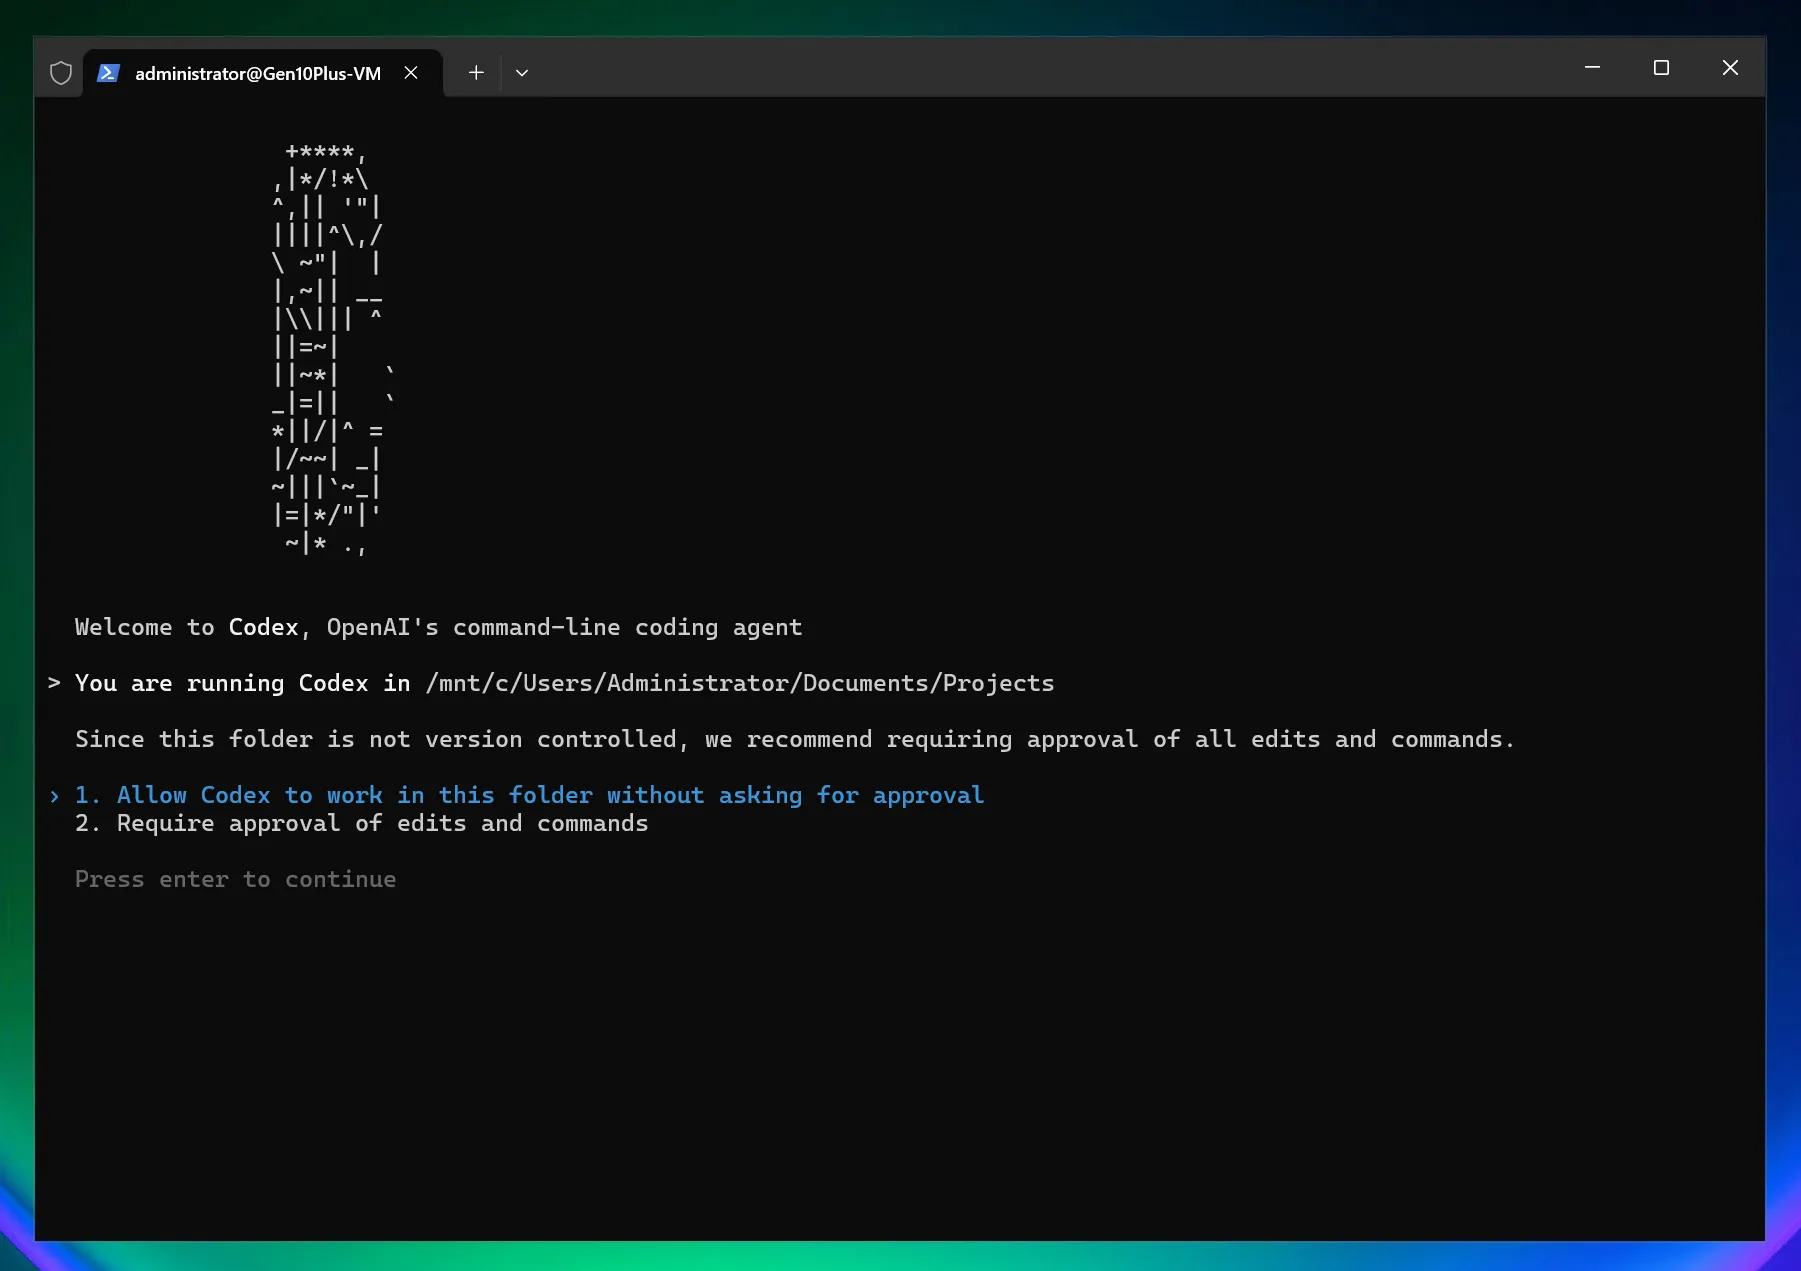
Set Codex CLI permissions: 1. Allow Codex to modify files directly; 2. Codex requires manual authorization to modify files
Select Model
/model
Use the arrow keys to pick a model in Select Model and Effort (the one in use is marked (current)) and press Enter, then choose a reasoning level in Select Reasoning Level: press Enter to make it the default, or s to use it for this session only. The level marked (default) is the model_reasoning_effort value in your config file (high with this guide's configuration).
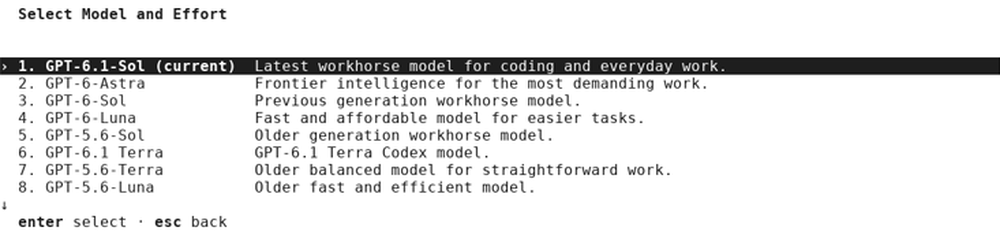

Note: after configuration, every model in
/modelgoes through the 88API endpoint and does not use your official account quota. Models currently available on 88API for Codex: gpt-6.1-sol (script default, recommended), gpt-6-astra (flagship), gpt-6-sol, gpt-5.6-sol (default in earlier script versions), gpt-5.6-terra, gpt-6.1-terra, gpt-5.5 (your token's group must include the model; if your group does not offer gpt-6.1-sol, use gpt-6-astra). gpt-6-luna and gpt-5.6-luna, which also appear in the list, are not offered by 88API yet; selecting them returns a model-not-found error.
macOS Graphical Guide
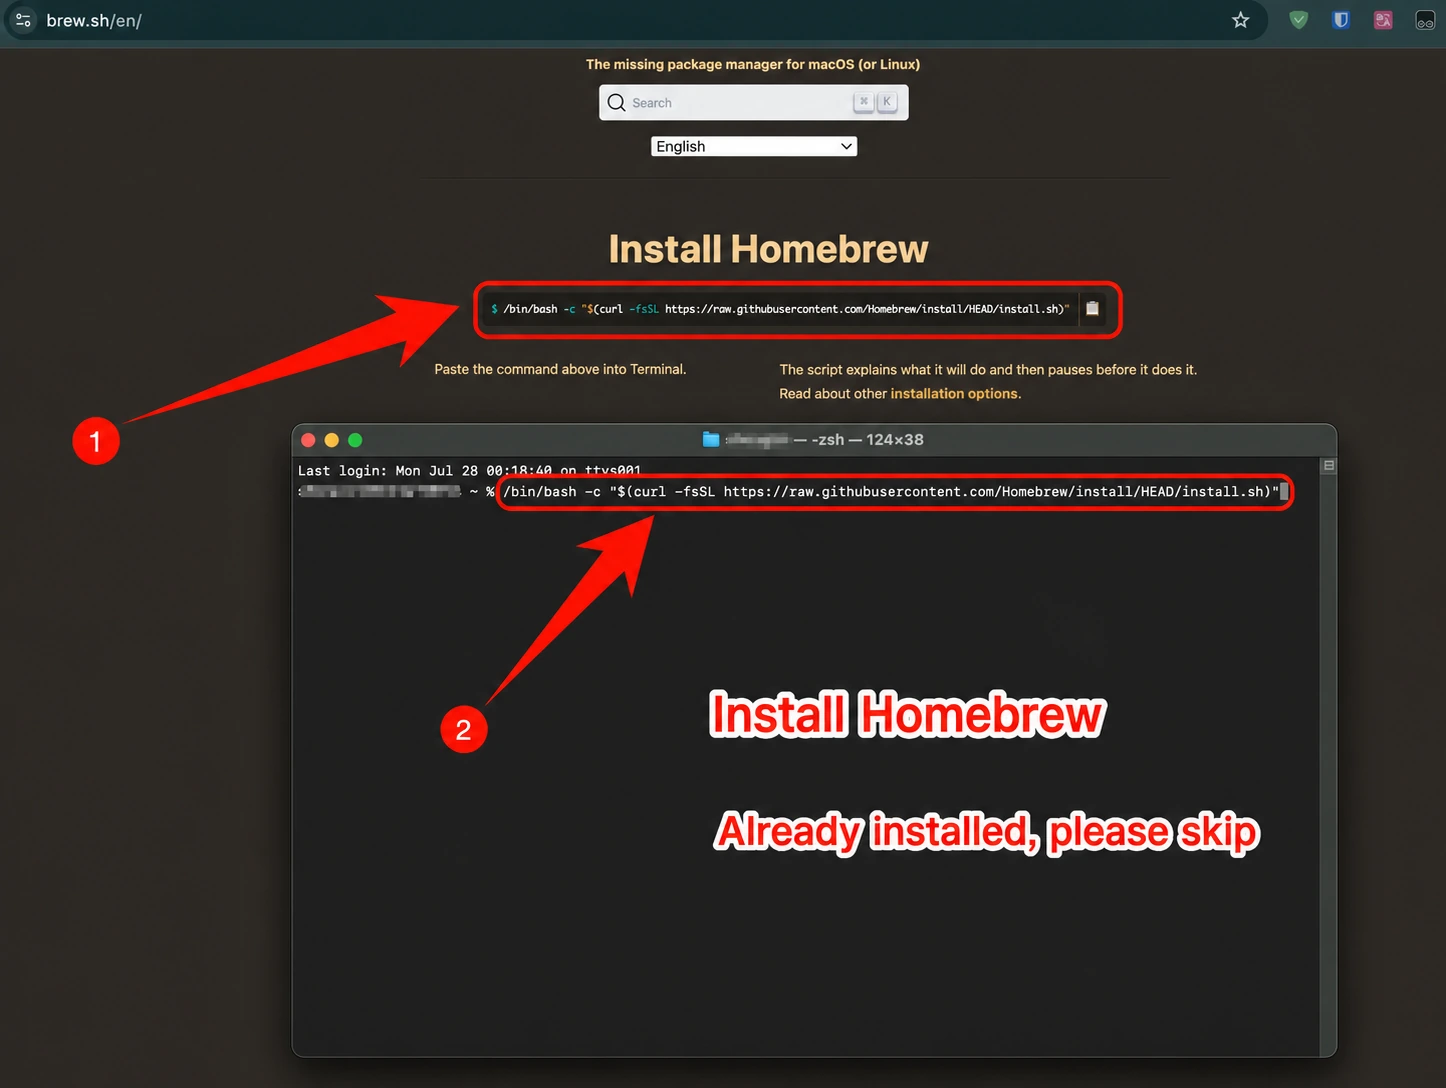
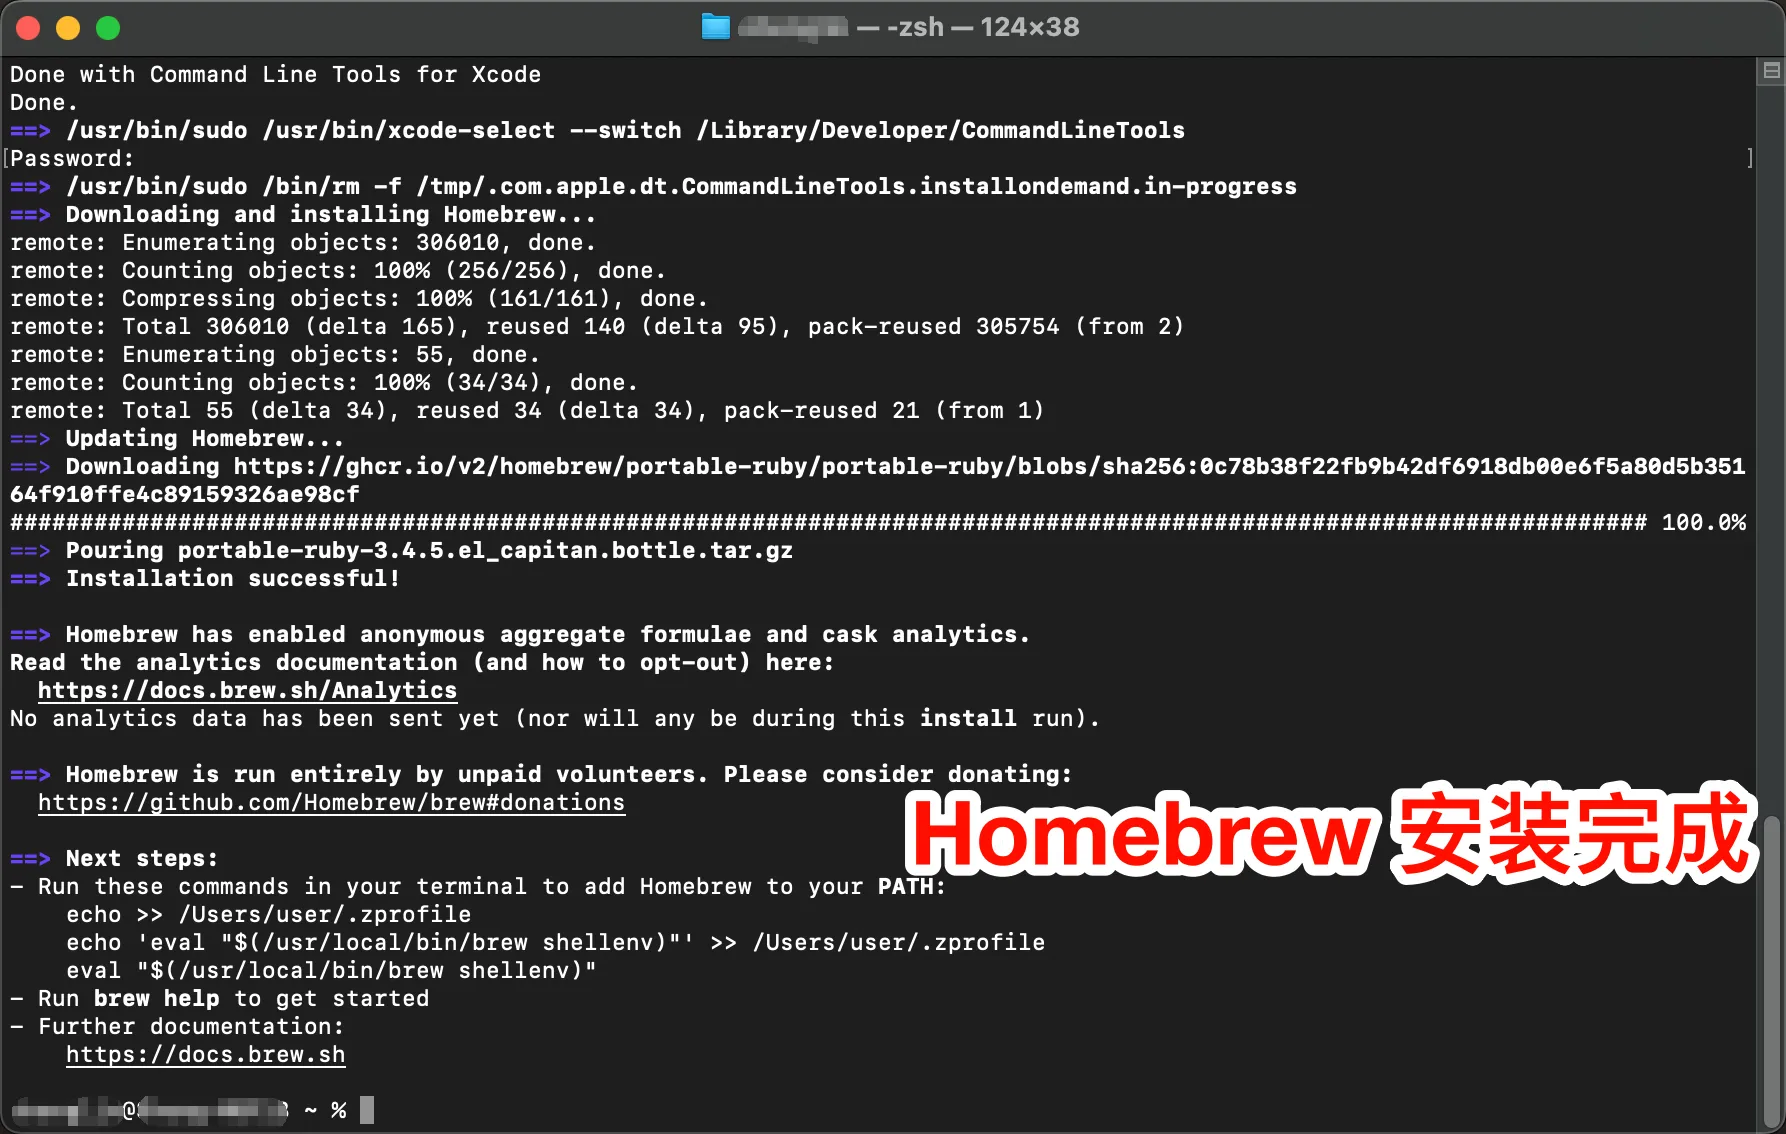
1. Install Homebrew (Skip if already installed)
Homebrew is the package manager for macOS that installs missing software.
Official Website: https://brew.sh
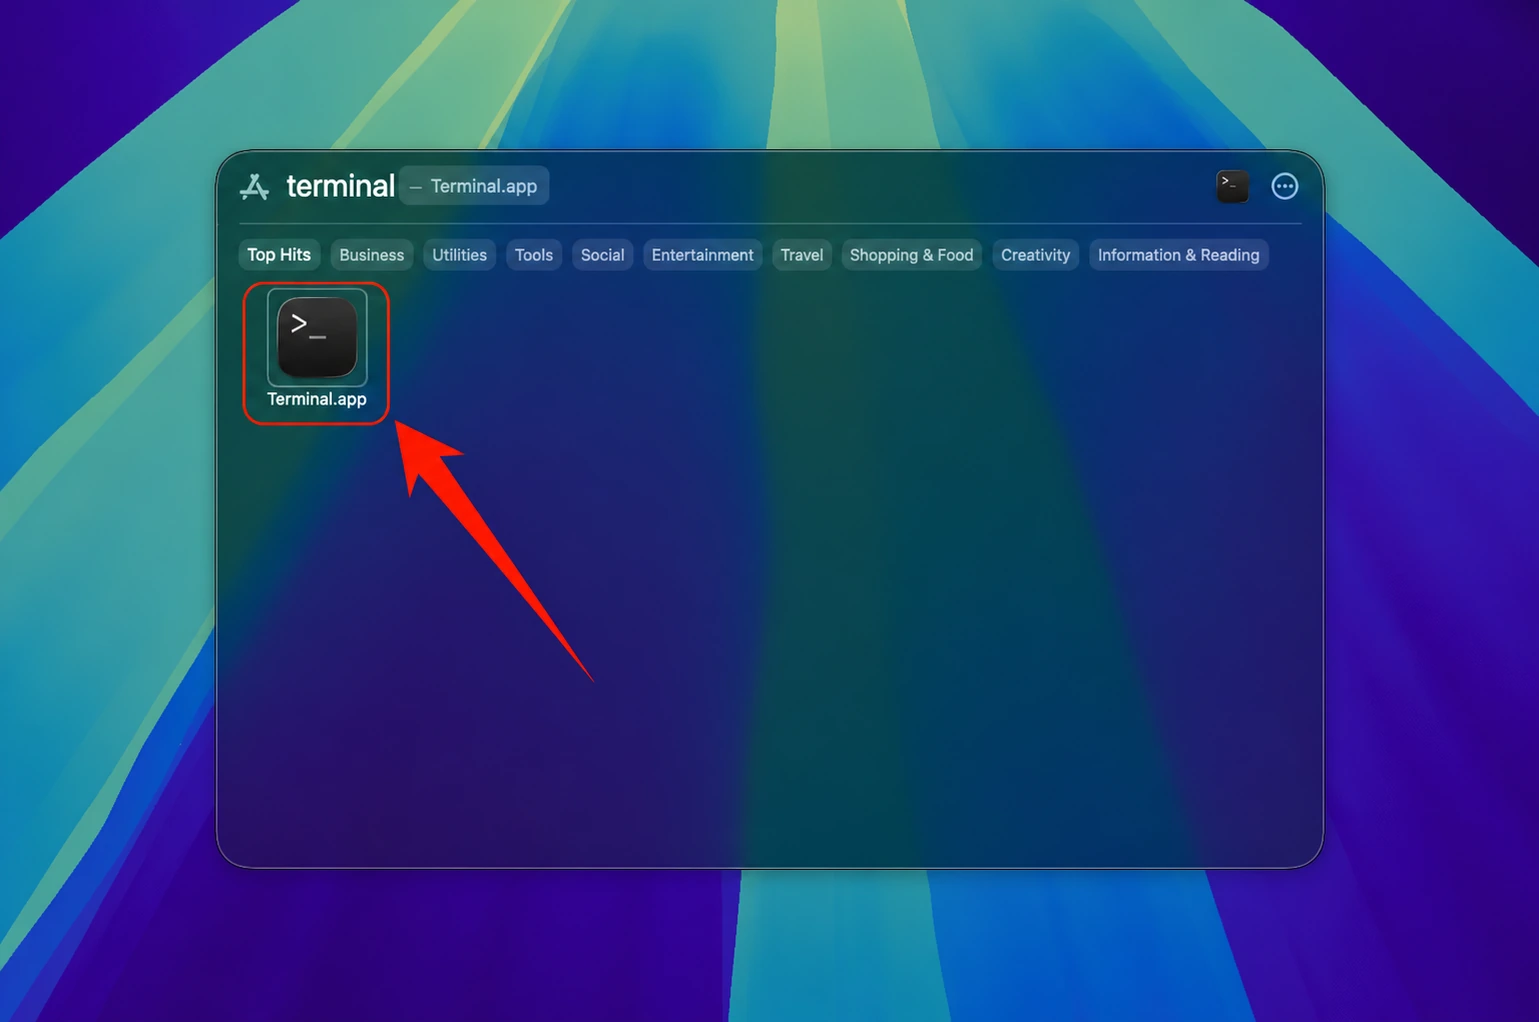
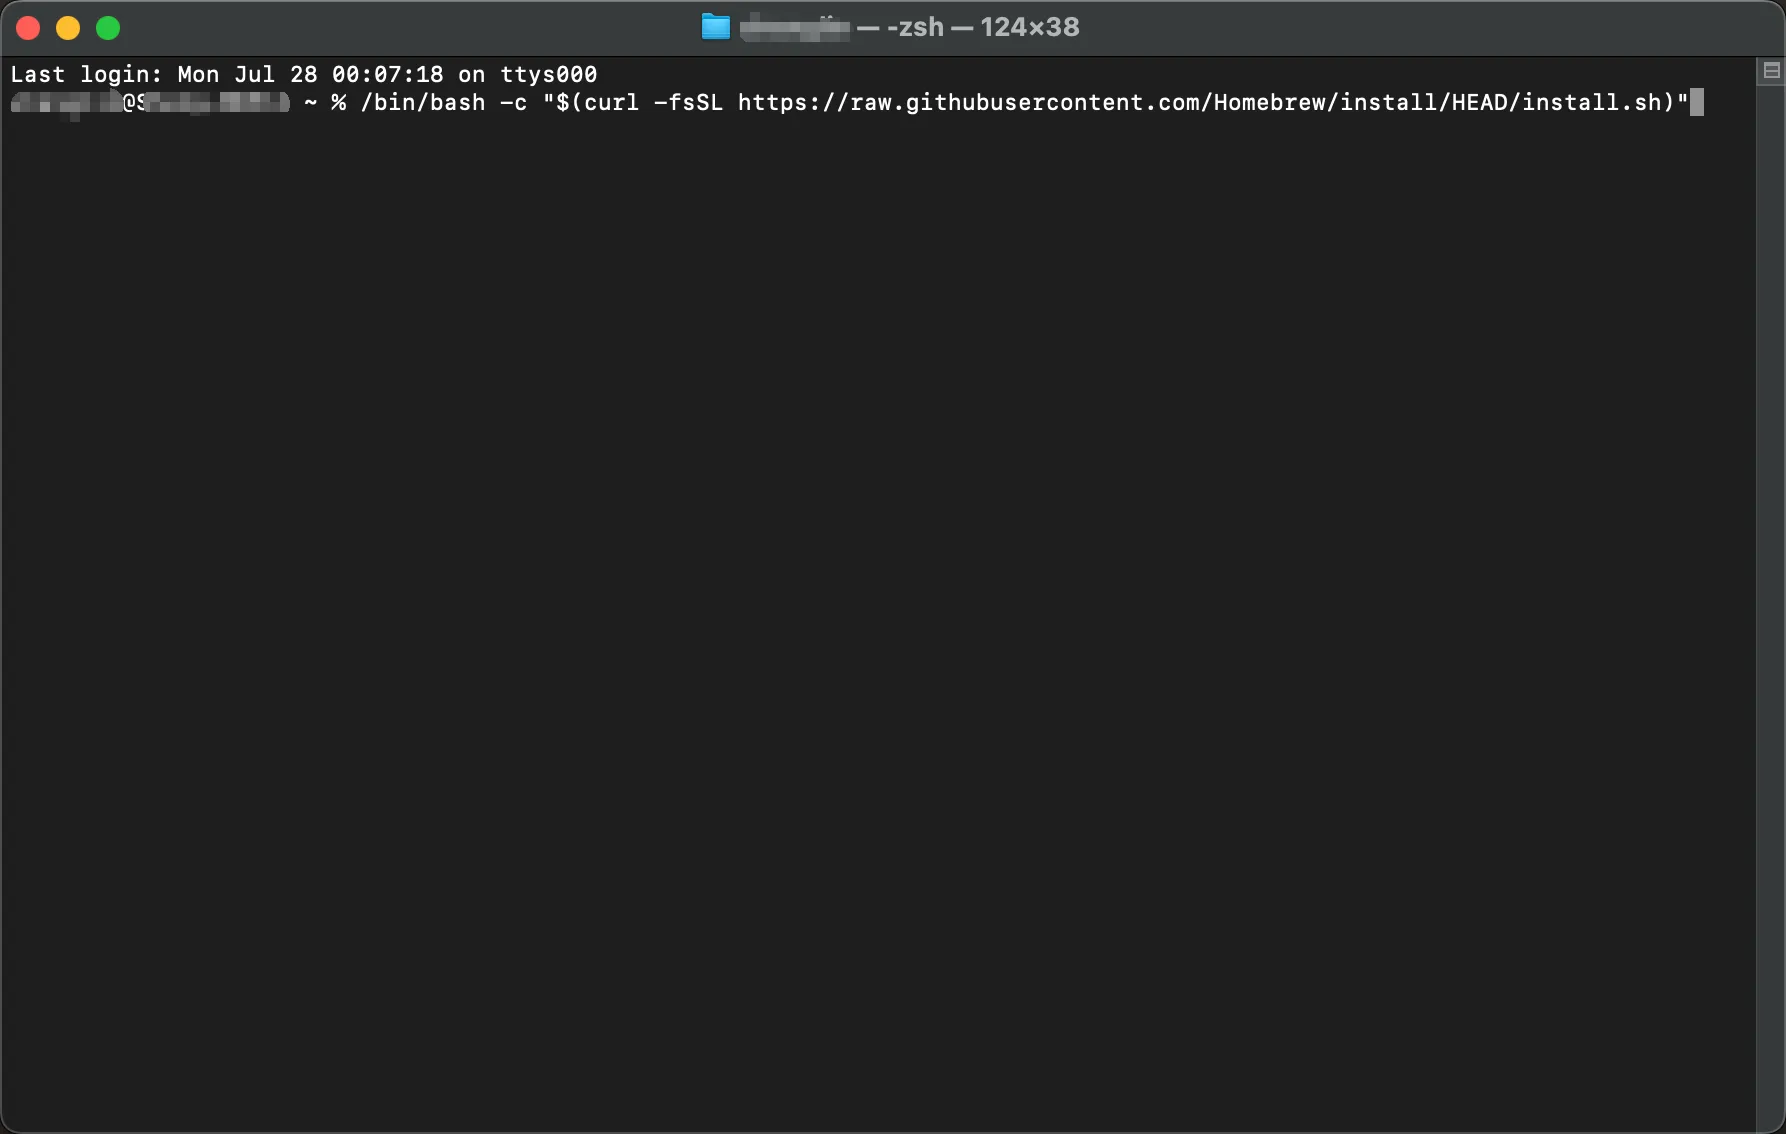
Install Homebrew
/bin/bash -c "$(curl -fsSL https://raw.githubusercontent.com/Homebrew/install/HEAD/install.sh)"
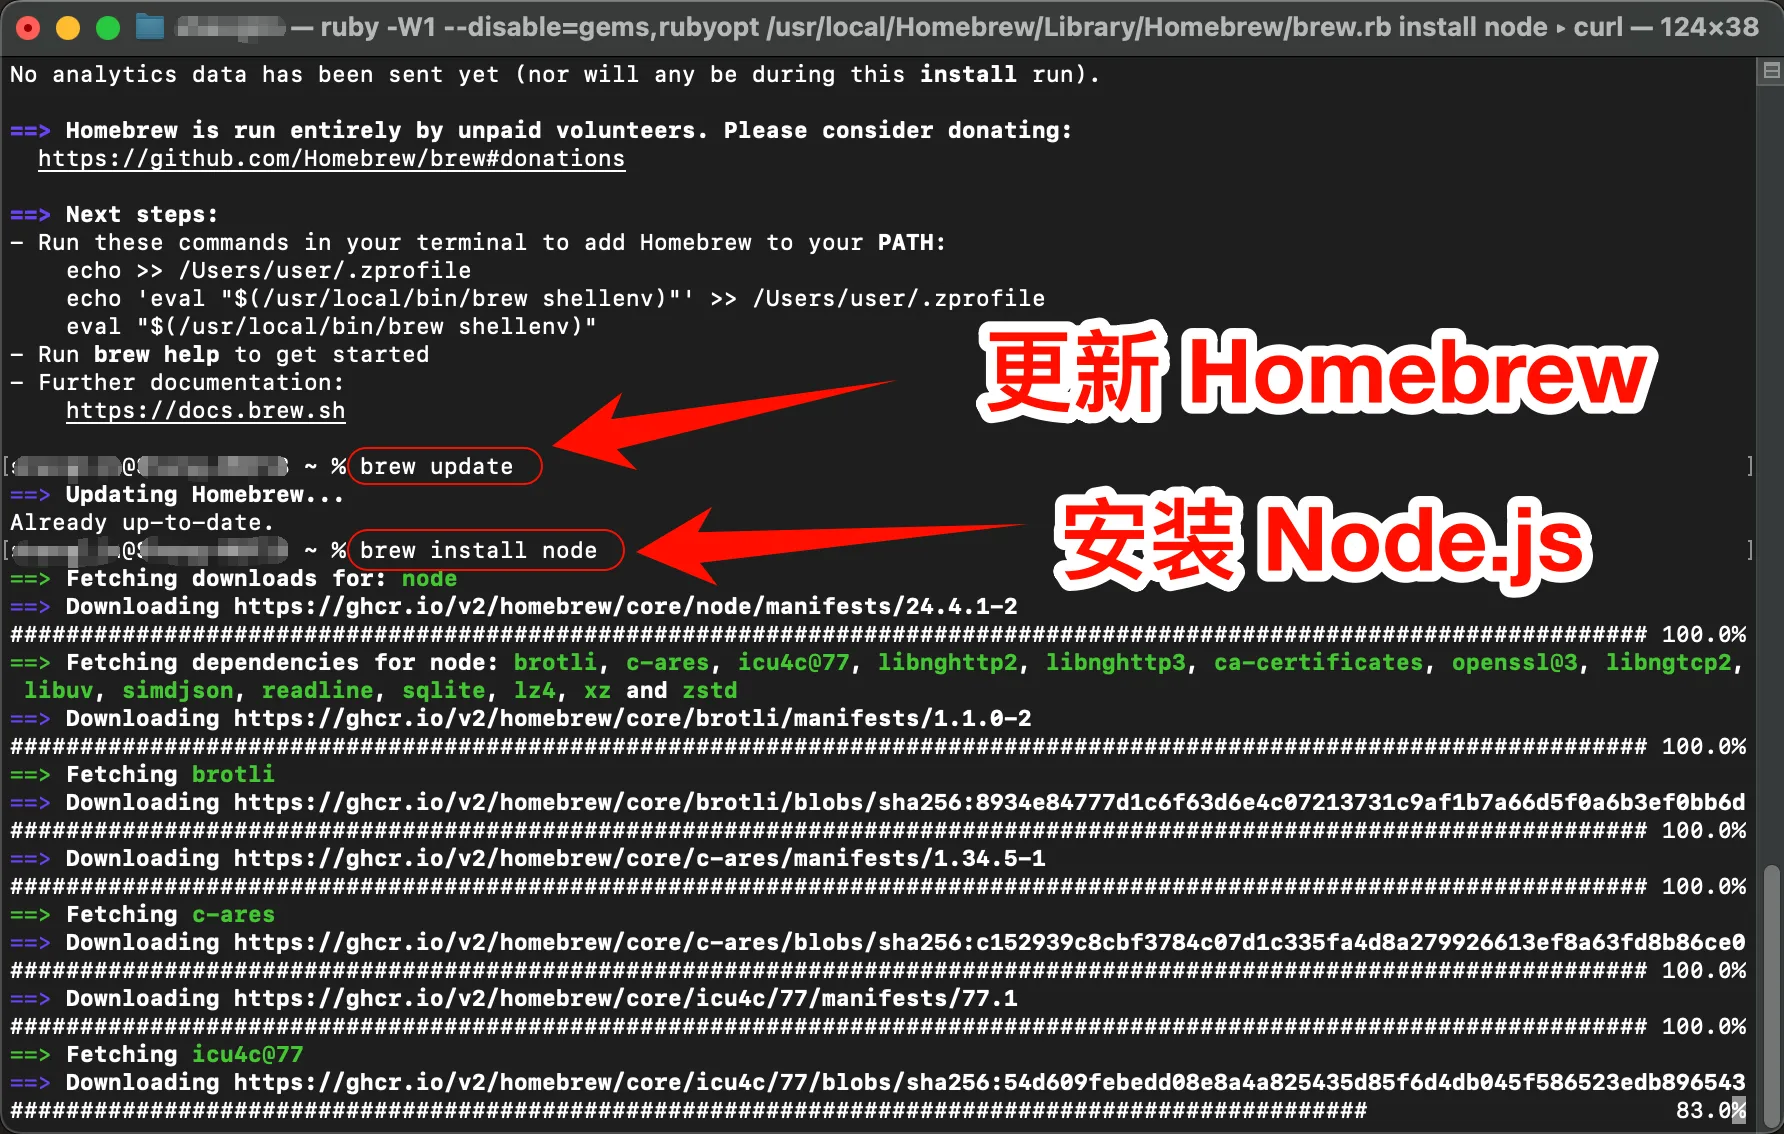
2. Install Node.js Environment
Node.js Environment Installation Steps
Update Homebrew brew update Install Node.js brew install node
macOS Notes
- If you encounter permission issues, you may need to use
sudo - The first run may require permission in System Settings
- It is recommended to use
TerminaloriTerm2
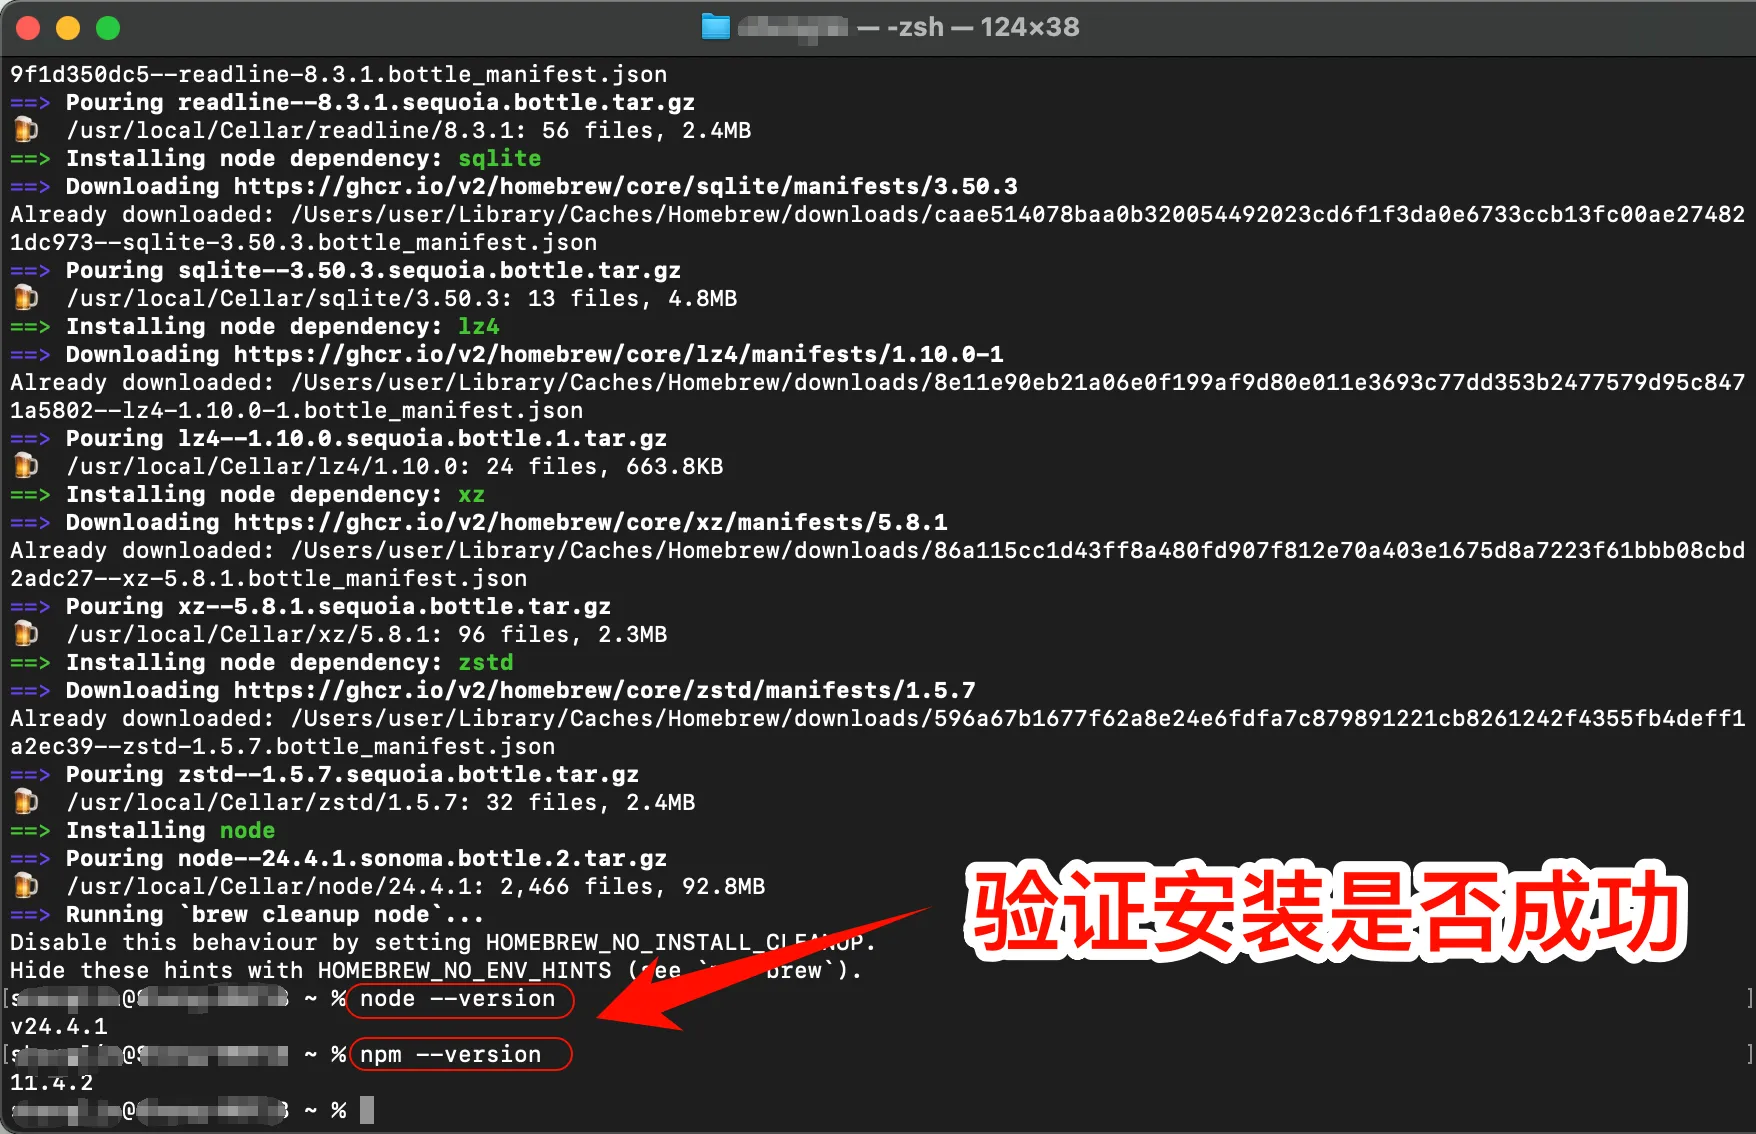
Verify Successful Installation
After installation, open the terminal and enter the following commands:
node --version
npm --version
If the version numbers are displayed, the installation was successful.
3. Install Codex CLI
Install Codex CLI
Open the terminal and run:
npm install -g @openai/codexIf you encounter permission issues: sudo npm install -g @openai/codex. You can also install it with Homebrew: brew install --cask codex.
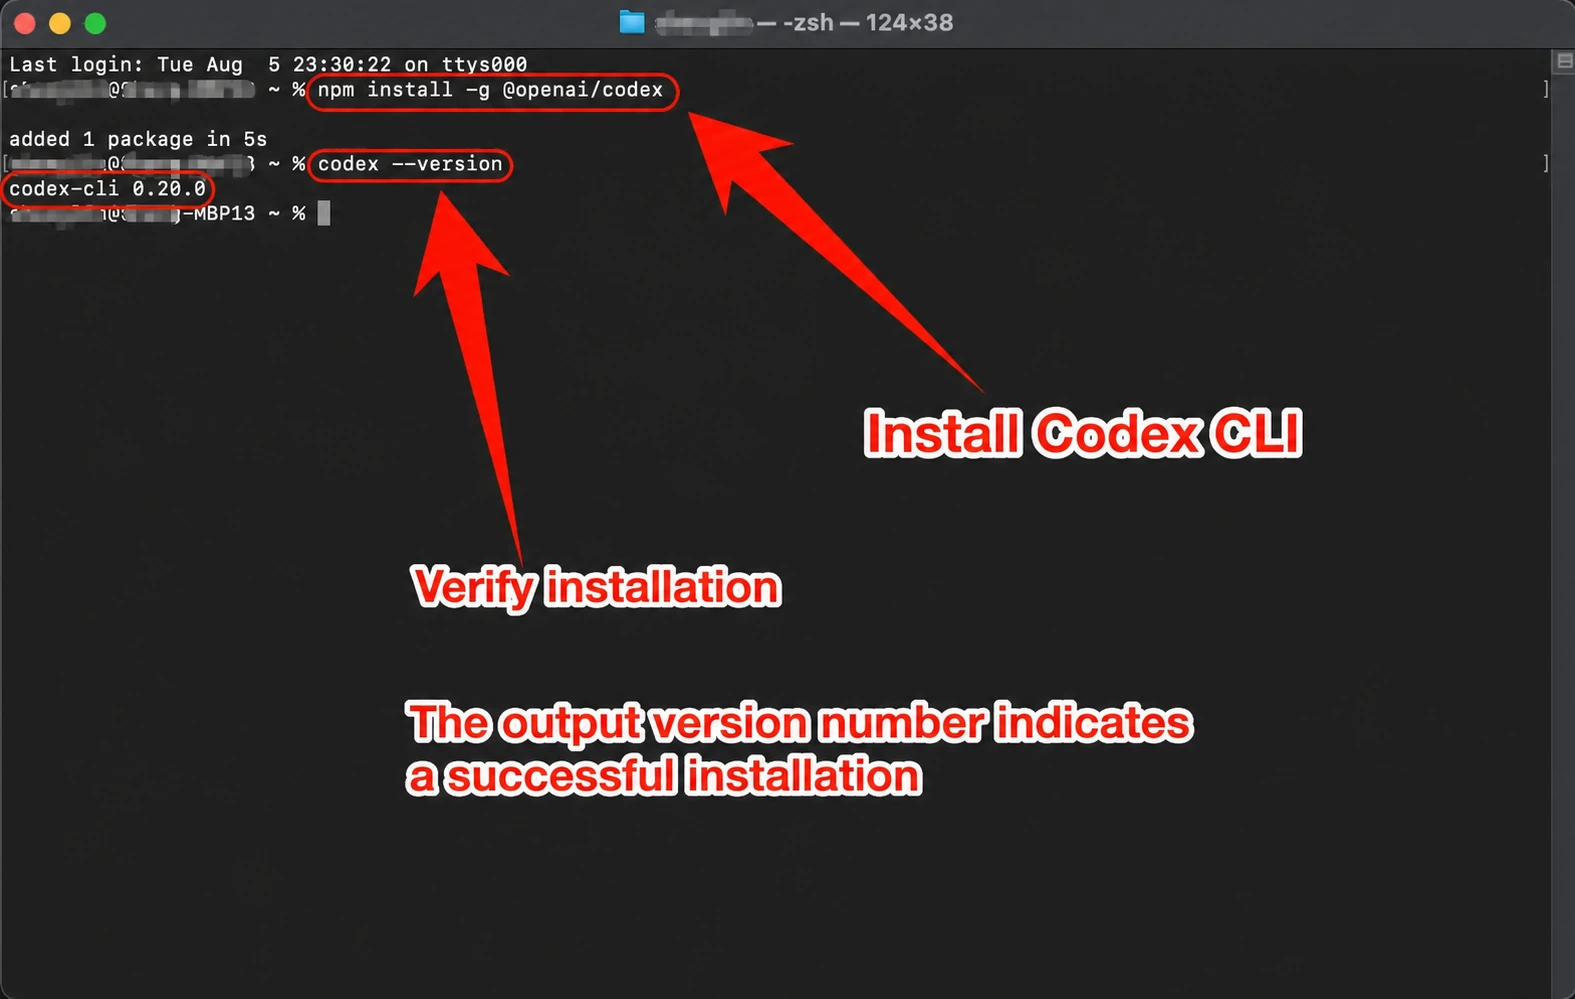
Verify Codex CLI Installation
After installation, enter the following command to check if the installation
was successful: codex --version If the version number is displayed,
congratulations! Codex CLI has been successfully installed.
4. Modify Configuration File
One-Click Modification of Codex CLI Configuration File
bash <(curl -fsSL https://88api.ai/helper/codex-cli-setup.sh)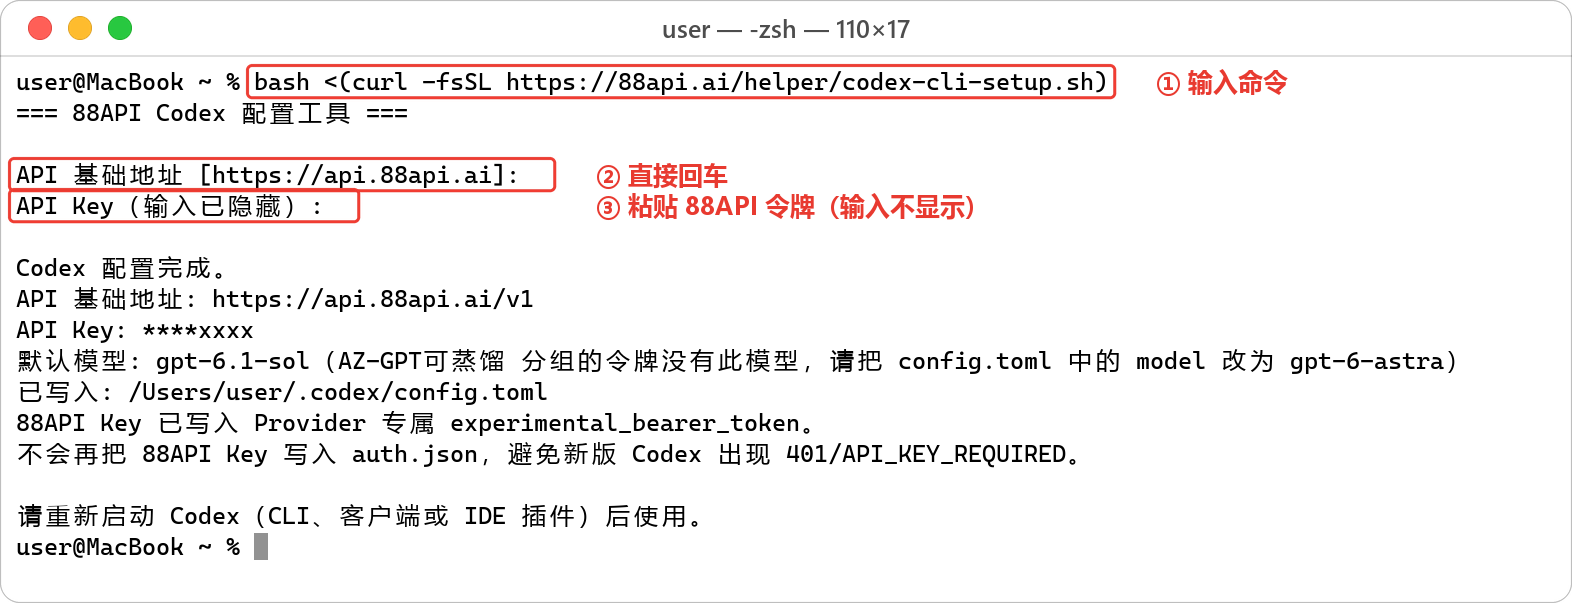
The script's prompts are in Chinese; the values are the same as in the text.
At the API 基础地址 (API base URL) prompt, just press Enter (the default is https://api.88api.ai; the script appends /v1 itself, giving https://api.88api.ai/v1), then paste your 88API token (the input is hidden). The script writes ~/.codex/config.toml (if CODEX_HOME is set, it writes there instead) and by default uses
model_provider = "88api", wire_api = "responses" and a provider-scoped
experimental_bearer_token; at the end it prints API 基础地址: https://api.88api.ai/v1 and 已写入: …/config.toml. The new script no longer writes the 88API key into
auth.json.OPENAI_API_KEY.
Note: the script overwrites an existing
config.toml. The original file is backed up automatically asconfig.toml.bak.<timestamp>(the script prints已备份原配置: …). If you had configured MCP servers, trusted projects or other providers, merge them back from the backup.
Manual config.toml Configuration (Optional)
To configure manually, write the following to ~/.codex/config.toml:
model = "gpt-6.1-sol"
model_provider = "88api"
model_reasoning_effort = "high"

[model_providers.88api]
name = "88API"
base_url = "https://api.88api.ai/v1"
wire_api = "responses"
supports_websockets = false
experimental_bearer_token = "sk-your-88api-key"
Note: base_url must end with /v1 (Codex only appends /responses and never adds /v1 itself; without /v1 the request is redirected to the website and fails). wire_api must be responses (newer Codex versions removed chat).
5. Start Using Codex CLI
You can now start using Codex CLI!
Launch Codex CLI
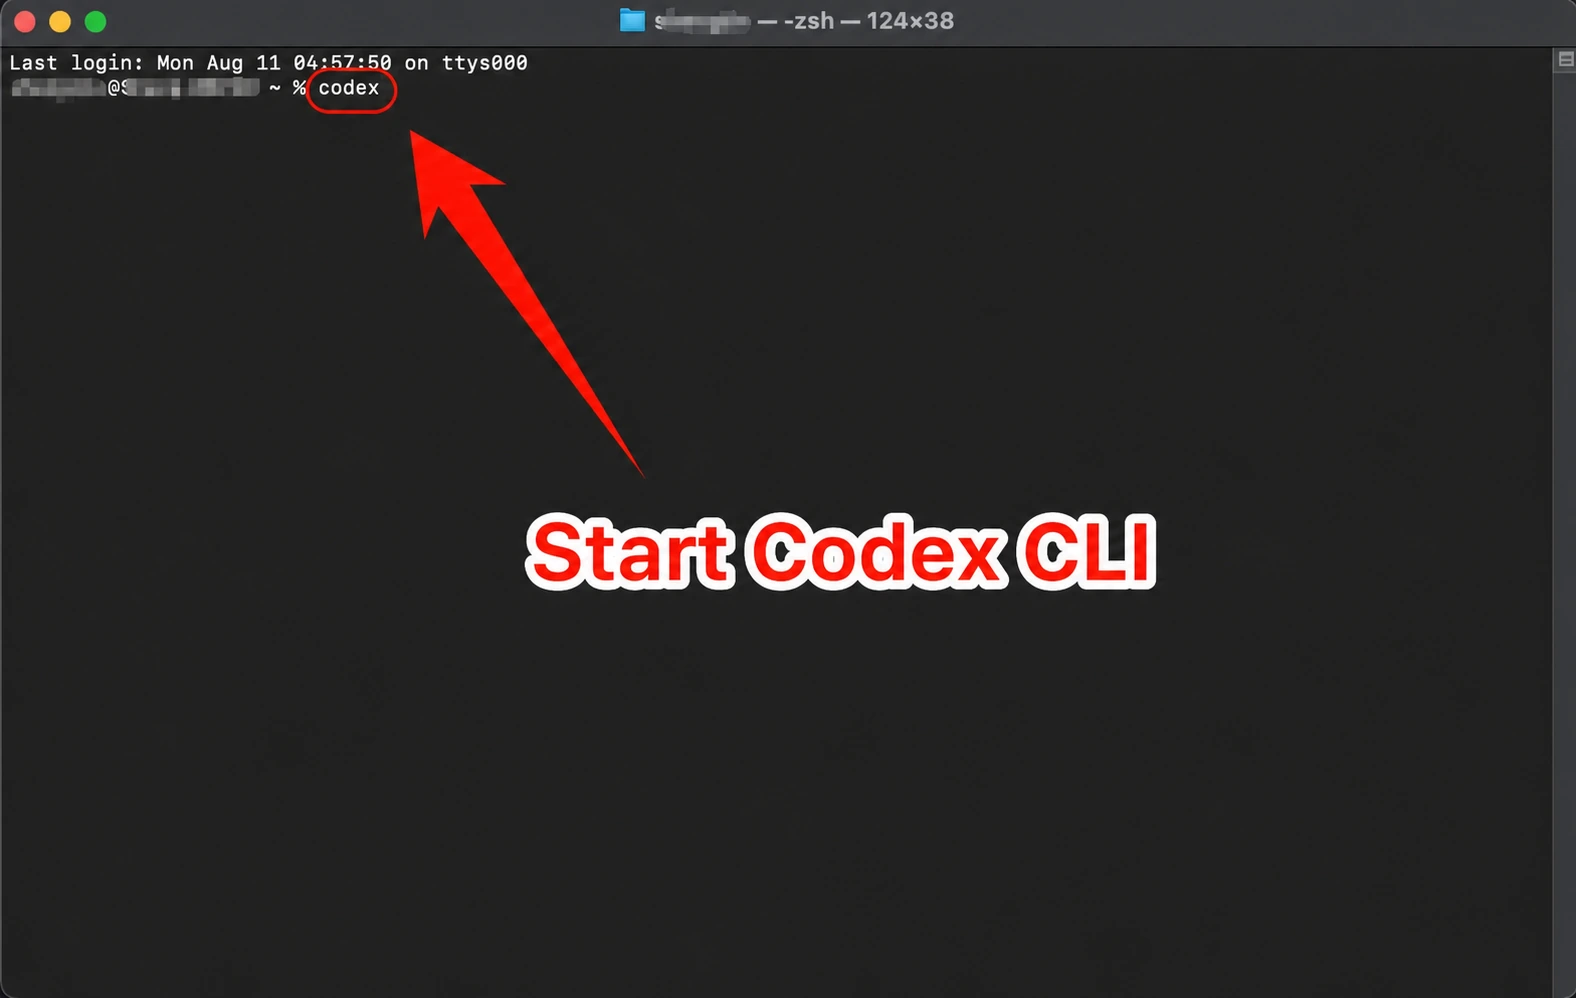
Launch Codex CLI directly: codex. To use it in a specific project: first cd ~/path/to/your/project, then run codex.
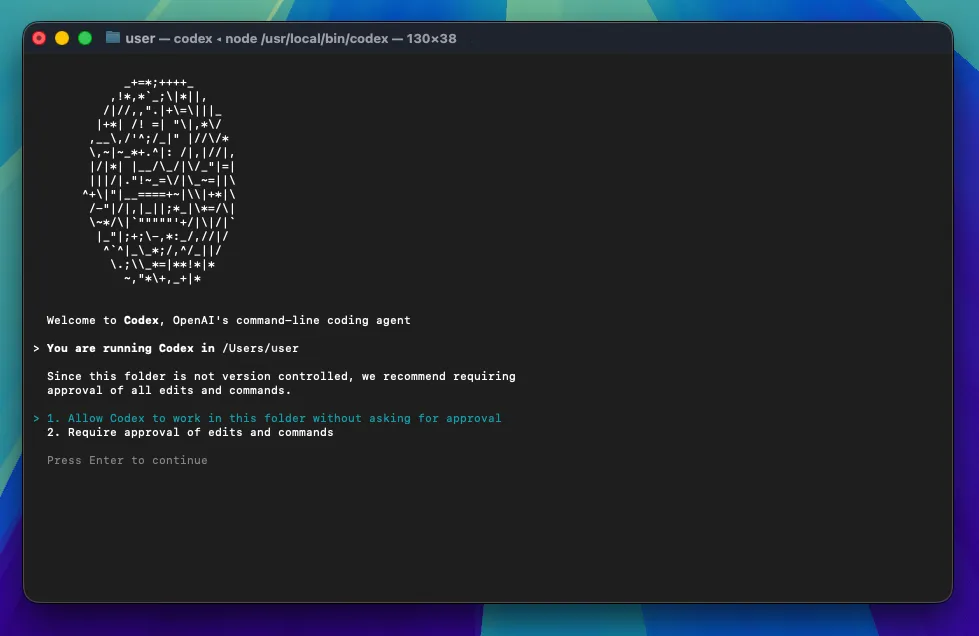
Set Codex CLI permissions: 1. Allow Codex to modify files directly; 2. Codex requires manual authorization to modify files
Use the arrow keys to pick a model in Select Model and Effort (the one in use is marked (current)) and press Enter, then choose a reasoning level in Select Reasoning Level: press Enter to make it the default, or s to use it for this session only. The level marked (default) is the model_reasoning_effort value in your config file (high with this guide's configuration).
Note: after configuration, every model in
/modelgoes through the 88API endpoint and does not use your official account quota. Models currently available on 88API for Codex: gpt-6.1-sol (script default, recommended), gpt-6-astra (flagship), gpt-6-sol, gpt-5.6-sol (default in earlier script versions), gpt-5.6-terra, gpt-6.1-terra, gpt-5.5 (your token's group must include the model; if your group does not offer gpt-6.1-sol, use gpt-6-astra). gpt-6-luna and gpt-5.6-luna, which also appear in the list, are not offered by 88API yet; selecting them returns a model-not-found error.
6. macOS Common Issues Resolution
Permission Error During Installation
Try the following solutions:
- Install using
sudo:sudo npm install -g @openai/codex - Or configure
npmto use the user directory:npm config set prefix ~/.npm-global
macOS Security Settings Block Execution
If the system blocks Codex CLI from running:
- Open "System Settings" → "Privacy & Security", find the blocked codex in the "Security" section and click "Open Anyway"
- Disabling Gatekeeper globally with
sudo spctl --master-disableis not recommended (Codex installed via npm is normally not blocked, and newer macOS versions no longer allow turning Gatekeeper off directly with this command)
Linux Graphical Guide
1. Install Node.js Environment
Codex CLI requires the Node.js environment to run.
Node.js Environment Installation Steps
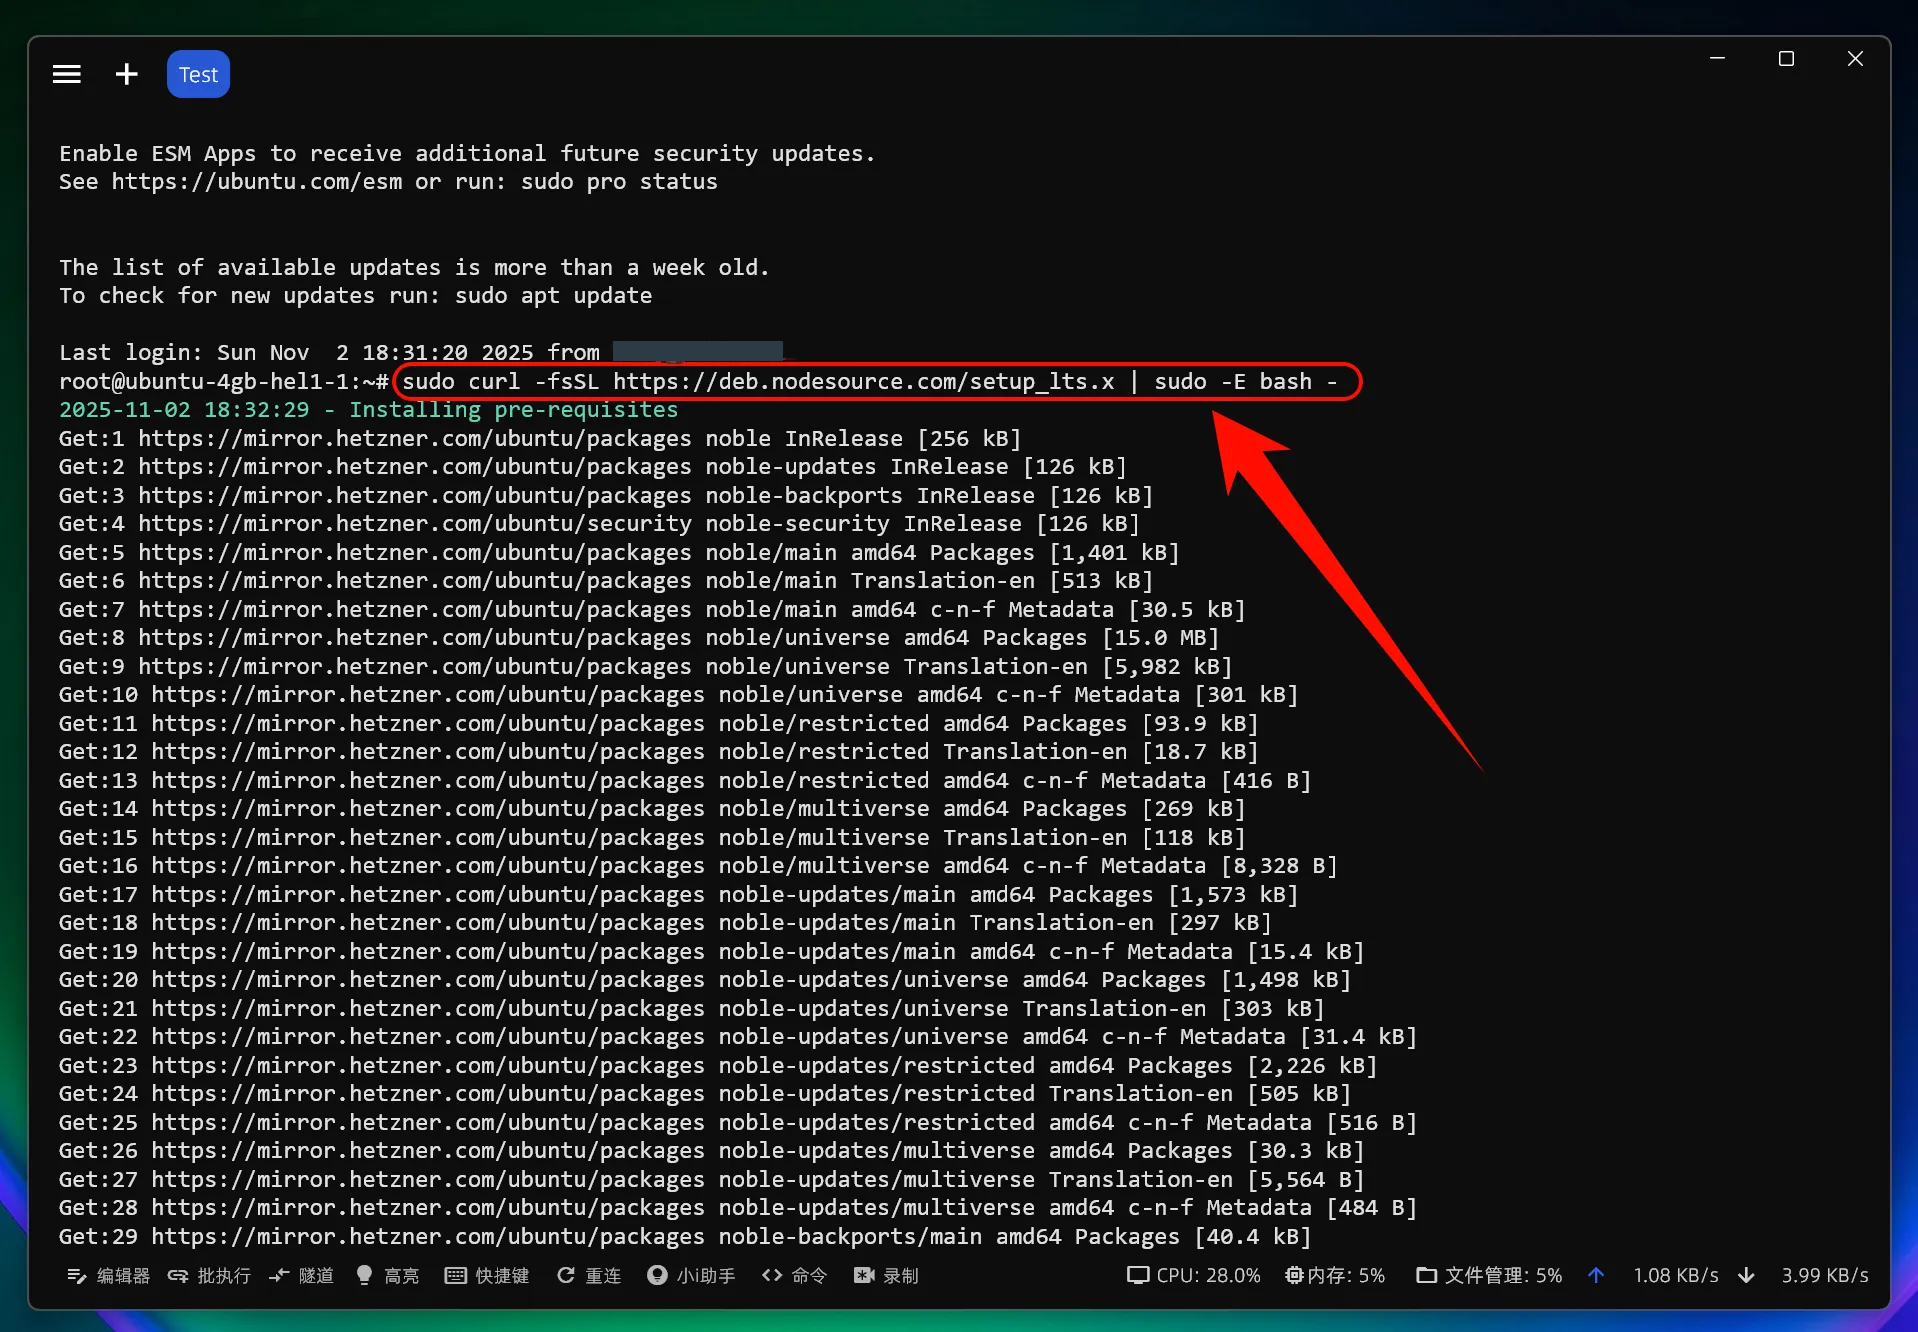
Add NodeSource repository sudo curl -fsSL https://deb.nodesource.com/setup_lts.x | sudo -E bash - Install Node.js sudo apt-get install -y nodejs
Linux Notes
- Some distributions may require installing additional dependencies
- Use sudo if you encounter permission issues
- Ensure your user has write permissions in the npm global directory
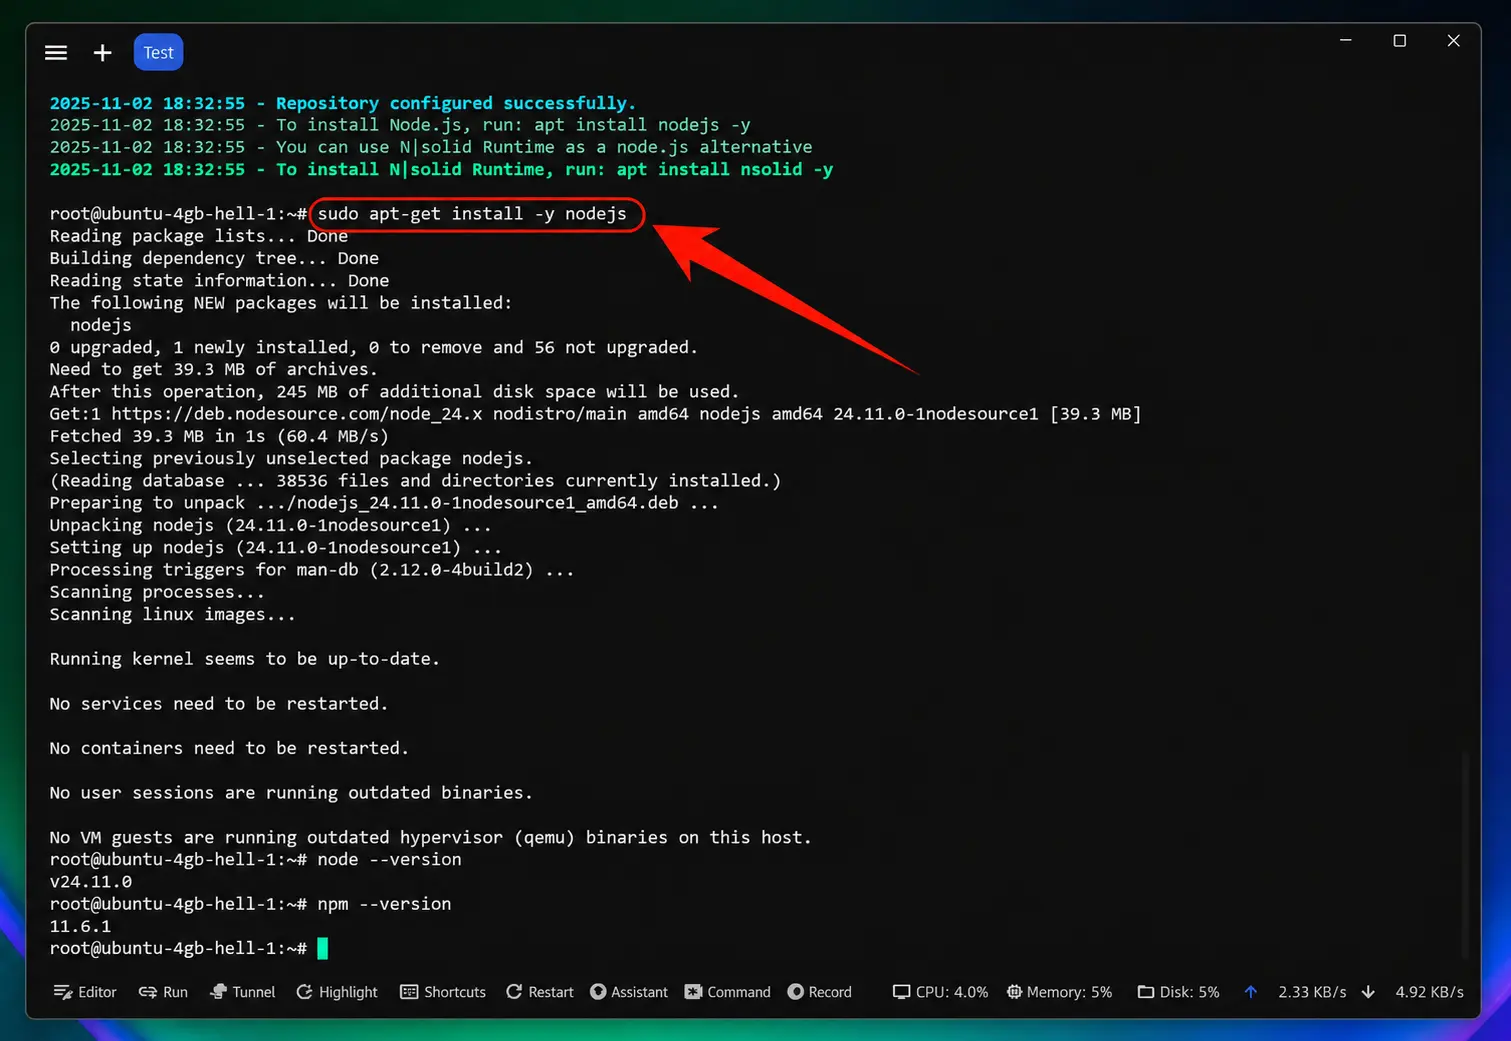
Verify Successful Installation
After installation, open the terminal and enter the following commands:
node --version
npm --version
If the version numbers are displayed, the installation was successful.
2. Install Codex CLI
Install Codex CLI
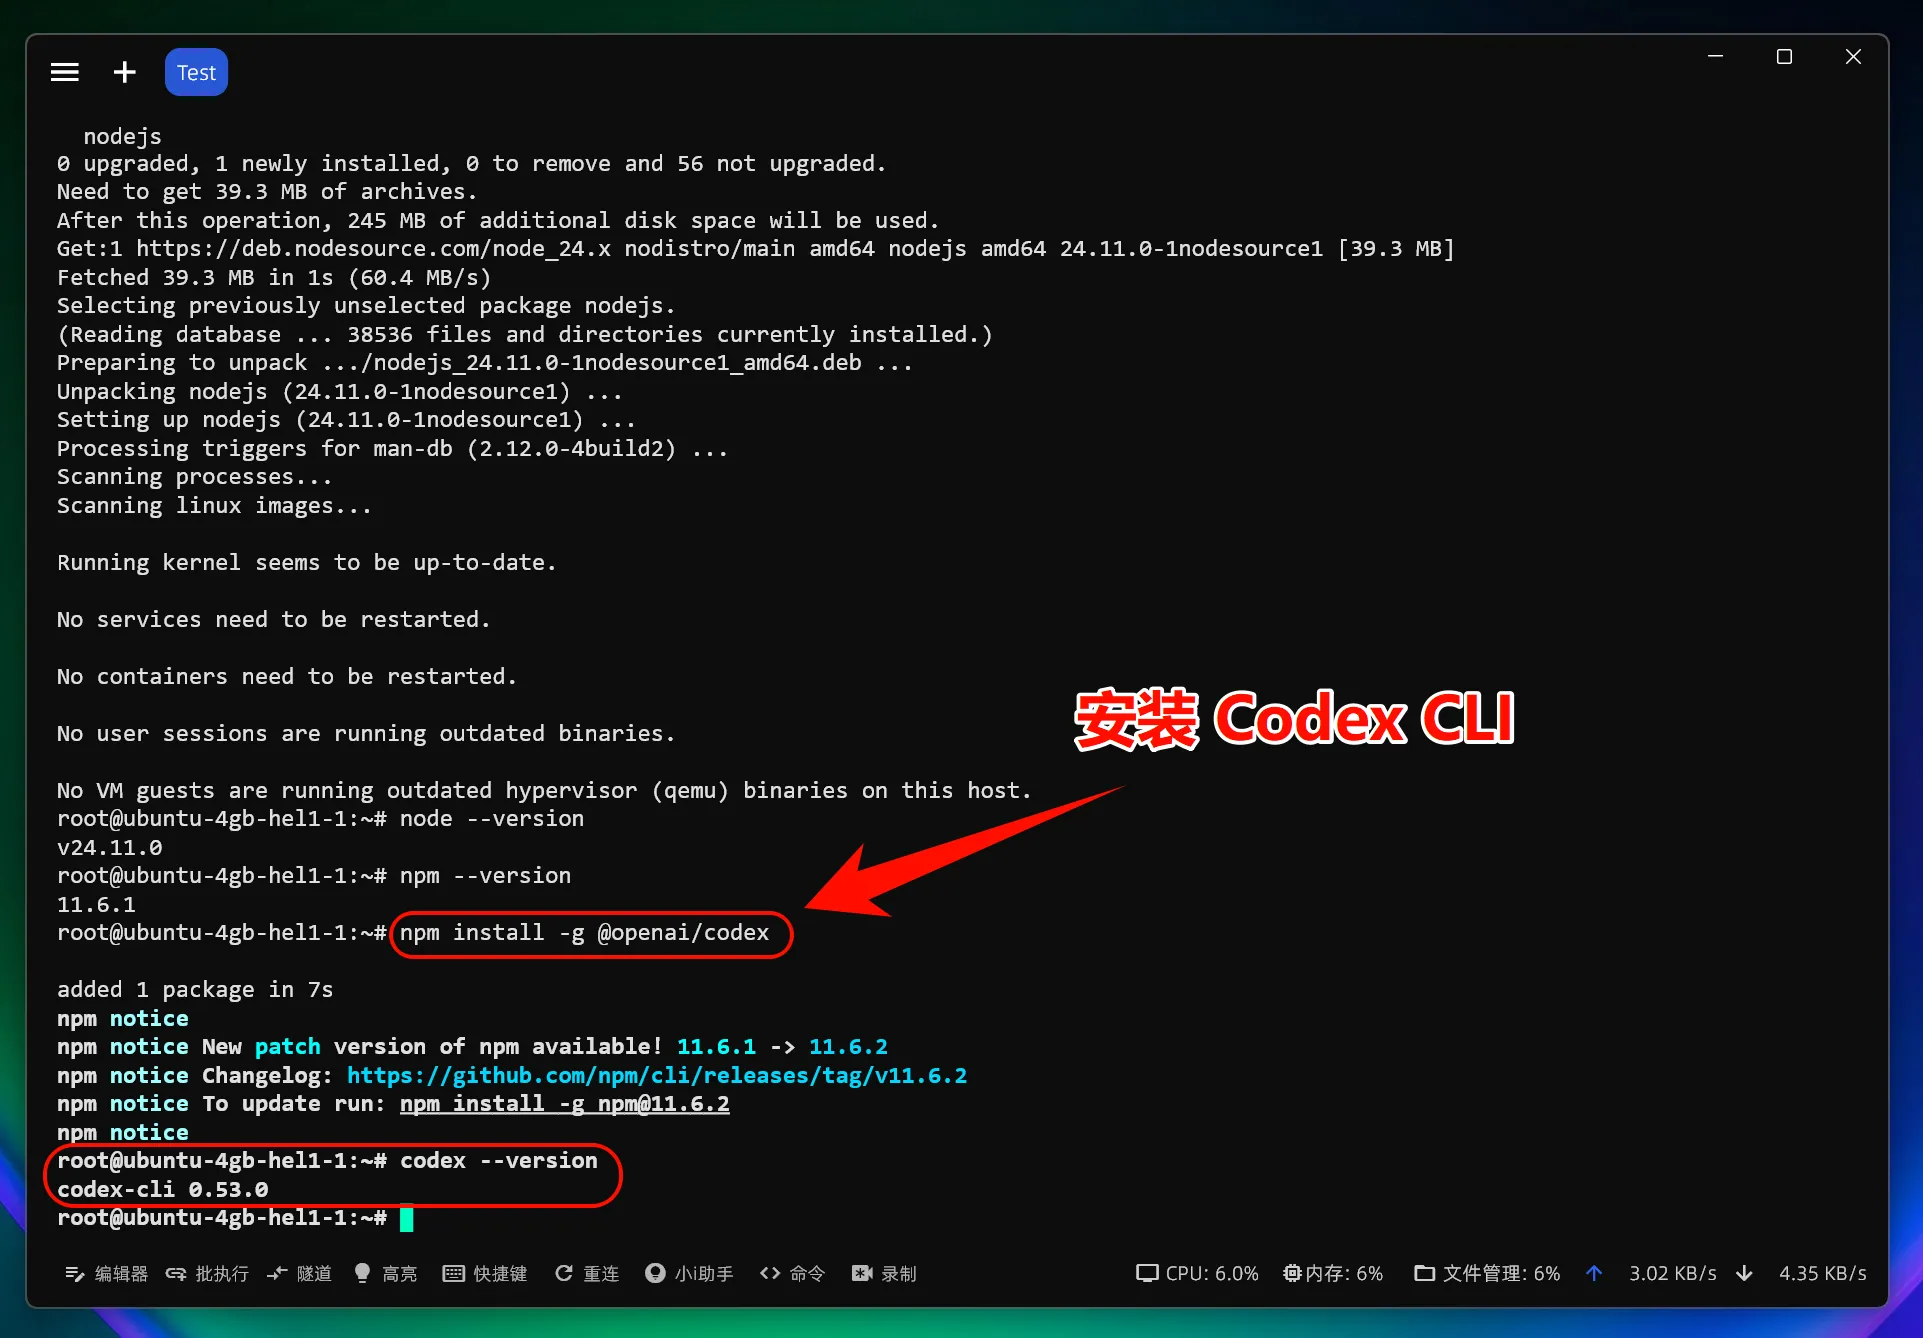
Open the terminal and run:
npm install -g @openai/codexIf you encounter permission issues: sudo npm install -g @openai/codex
Verify Codex CLI Installation
After installation, enter the following command to check if the installation
was successful: codex --version If the version number is displayed,
congratulations! Codex CLI has been successfully installed.
3. Modify Configuration File
One-Click Modification of Codex CLI Configuration File
bash <(curl -fsSL https://88api.ai/helper/codex-cli-setup.sh)
The script's prompts are in Chinese; the values are the same as in the text.
At the API 基础地址 (API base URL) prompt, just press Enter (the default is https://api.88api.ai; the script appends /v1 itself, giving https://api.88api.ai/v1), then paste your 88API token (the input is hidden). The script writes ~/.codex/config.toml (if CODEX_HOME is set, it writes there instead) and by default uses
model_provider = "88api", wire_api = "responses" and a provider-scoped
experimental_bearer_token; at the end it prints API 基础地址: https://api.88api.ai/v1 and 已写入: …/config.toml. The new script no longer writes the 88API key into
auth.json.OPENAI_API_KEY.
Note: the script overwrites an existing
config.toml. The original file is backed up automatically asconfig.toml.bak.<timestamp>(the script prints已备份原配置: …). If you had configured MCP servers, trusted projects or other providers, merge them back from the backup.
Manual config.toml Configuration (Optional)
To configure manually, write the following to ~/.codex/config.toml:
model = "gpt-6.1-sol"
model_provider = "88api"
model_reasoning_effort = "high"

[model_providers.88api]
name = "88API"
base_url = "https://api.88api.ai/v1"
wire_api = "responses"
supports_websockets = false
experimental_bearer_token = "sk-your-88api-key"
Note: base_url must end with /v1 (Codex only appends /responses and never adds /v1 itself; without /v1 the request is redirected to the website and fails). wire_api must be responses (newer Codex versions removed chat).
4. Start Using Codex CLI
You can now start using Codex CLI!
Launch Codex CLI
# Navigate to your project directory
cd /path/to/your/project
# Launch Codex CLI
codex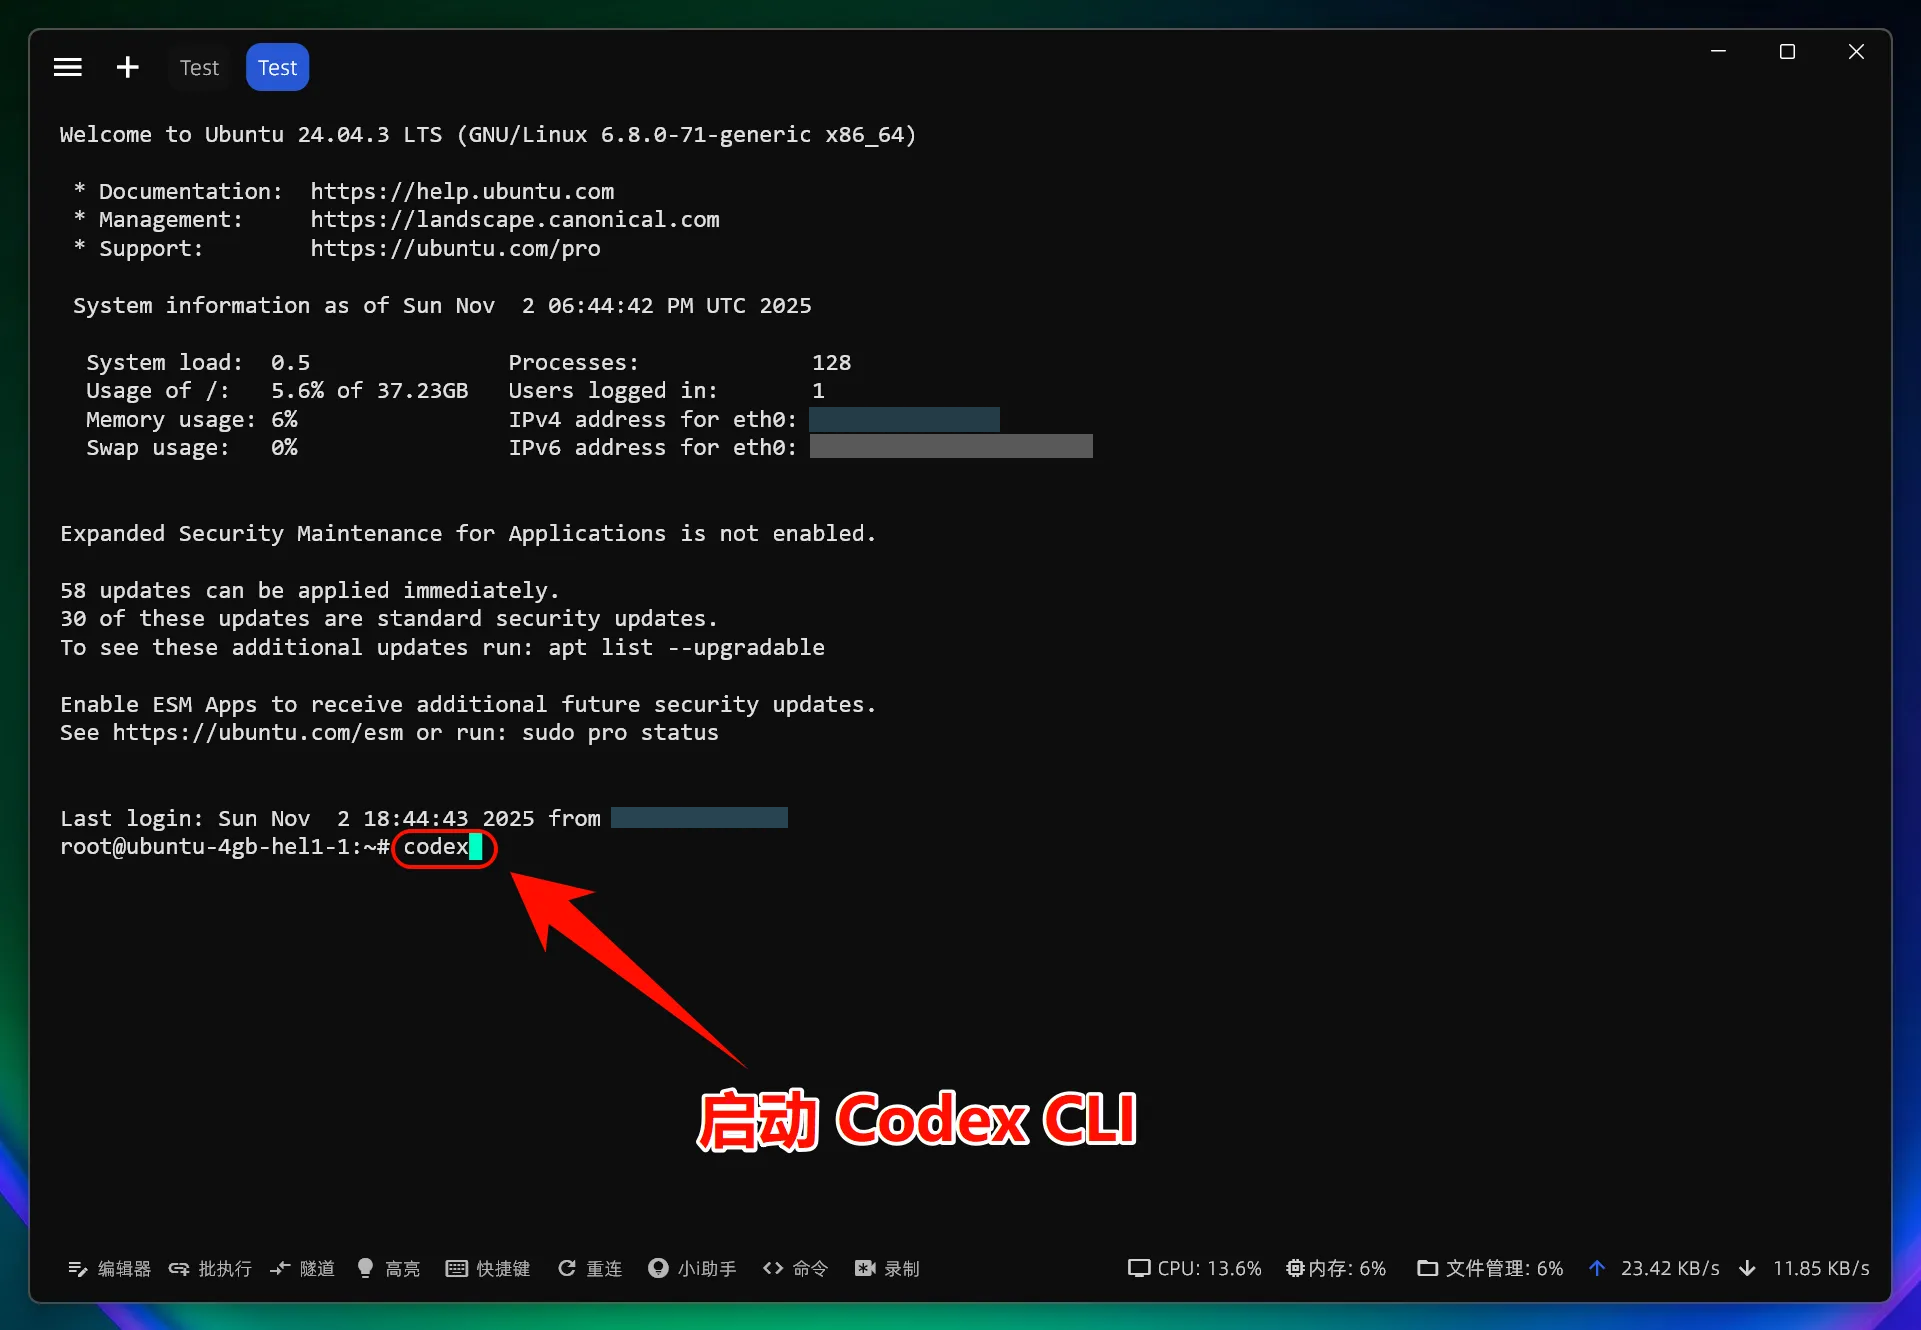
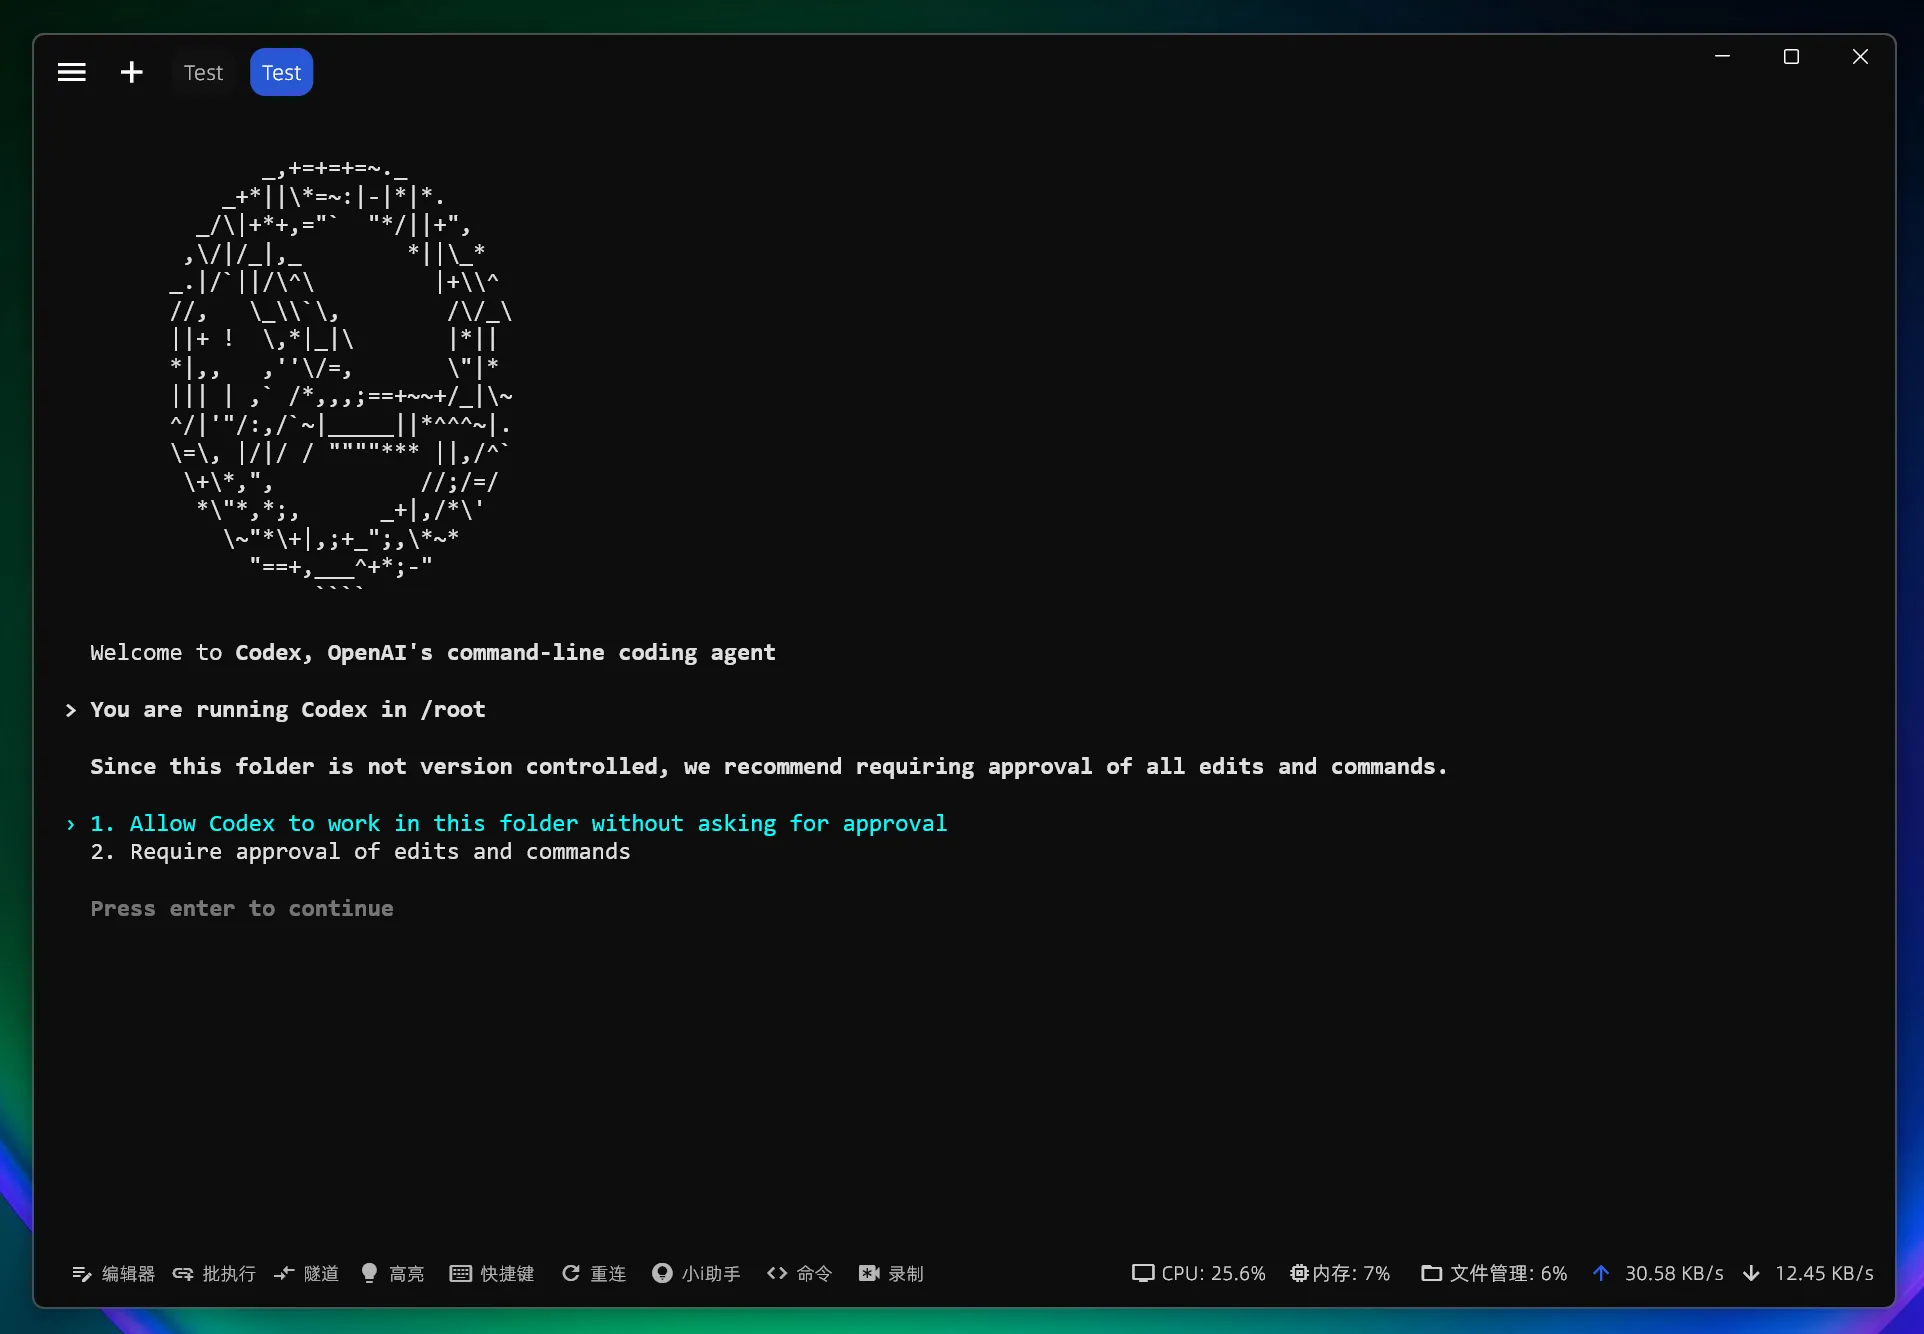
Set Codex CLI permissions: 1. Allow Codex to modify files directly; 2. Codex requires manual authorization to modify files
Use the arrow keys to pick a model in Select Model and Effort (the one in use is marked (current)) and press Enter, then choose a reasoning level in Select Reasoning Level: press Enter to make it the default, or s to use it for this session only. The level marked (default) is the model_reasoning_effort value in your config file (high with this guide's configuration).
Note: after configuration, every model in
/modelgoes through the 88API endpoint and does not use your official account quota. Models currently available on 88API for Codex: gpt-6.1-sol (script default, recommended), gpt-6-astra (flagship), gpt-6-sol, gpt-5.6-sol (default in earlier script versions), gpt-5.6-terra, gpt-6.1-terra, gpt-5.5 (your token's group must include the model; if your group does not offer gpt-6.1-sol, use gpt-6-astra). gpt-6-luna and gpt-5.6-luna, which also appear in the list, are not offered by 88API yet; selecting them returns a model-not-found error.
5. Linux Common Issues Resolution
Permission Error During Installation
Try the following solutions:
-
Install using
sudo:sudo npm install -g @openai/codex -
Or configure
npmto use the user directory:npm config set prefix ~/.npm-global -
Then add to
PATH:export PATH=~/.npm-global/bin:$PATH
Missing Dependency Libraries
Some Linux distributions require installing additional dependencies:
# Ubuntu/Debian
sudo apt install build-essential
# CentOS/RHEL
sudo dnf groupinstall "Development Tools"